Skip to content
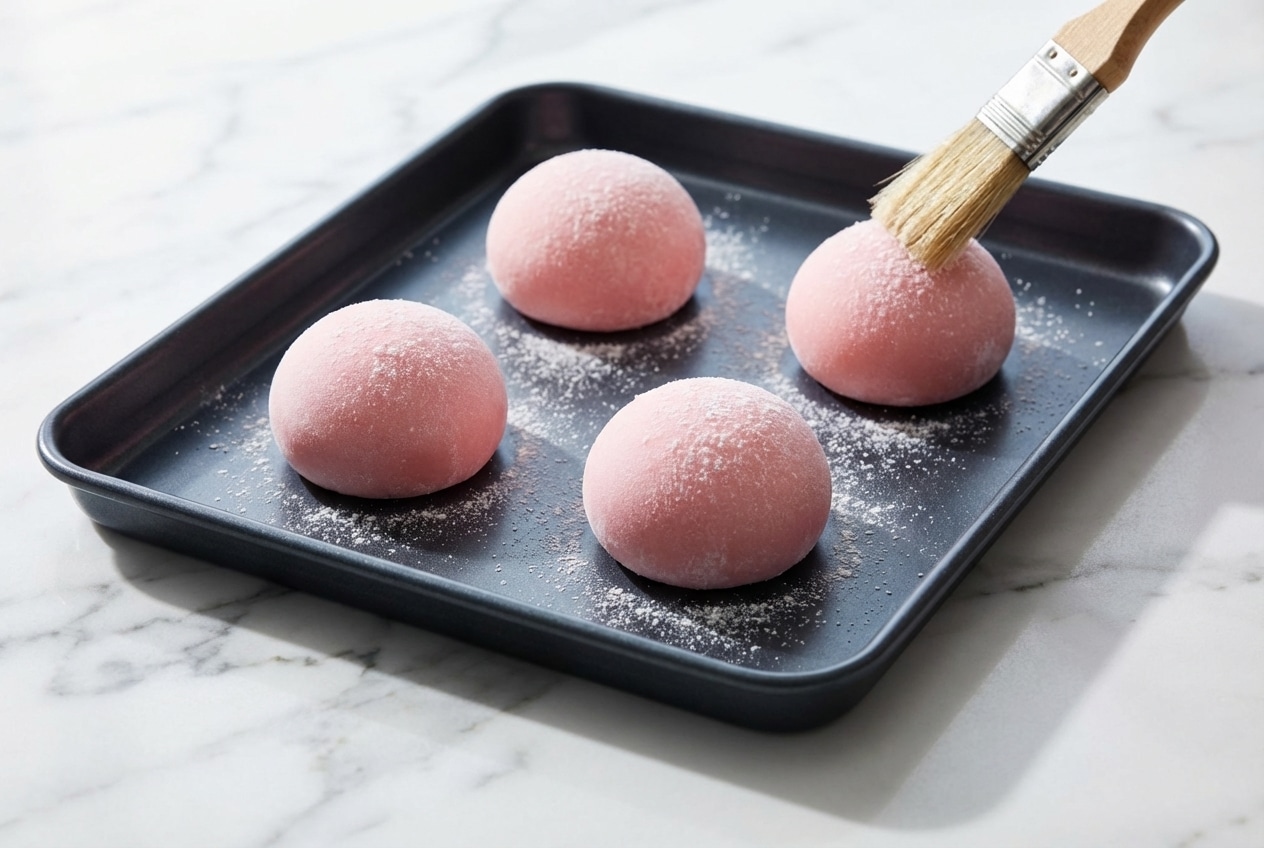
I still remember the first time I spotted mochi ice cream in a fancy freezer case, those perfect little pillows that look too cute to eat. Between places like Mochidoki and the tidy rows at Whole Foods, it’s become a global Japanese dessert obsession.
This Mochi Ice Cream recipe is the way I make them at home when I want that shop-quality look without the stress. I’ll walk you through the dough science, the “translucent” moment you’re aiming for, and the wrapping technique that keeps your ice cream from turning into a puddle.
Why You’ll Love This Recipe
The Silicone Sphere trick: I started freezing the ice cream in silicone semi-sphere molds, and suddenly wrapping stopped being chaotic. A dense, uniform core stays cold longer, so the mochi has time to hug it neatly.
Grown-up flavor in the dough: Even a simple sweet rice dough can taste flat. A tiny pinch of sea salt and a dab of vanilla bean paste gives the casing a real dessert-shop finish, not just “sweet wrapper.”
That signature chew: When the glutinous rice flour hits the right hydration, the dough turns soft, stretchy, and gently bouncy. The bite is pillowy, chewy, and velvet-smooth around the ice-cold center.
Cleaner rolling, cleaner sealing: With parchment paper and a confident snowfall of cornstarch, the sticky mochi behaves. You’ll get tidy circles, a good seal, and fewer torn spots.
Ingredients Needed

These are pantry-simple ingredients, but each one matters for texture. The sweet glutinous rice flour creates the chew, sugar keeps it tender after freezing, and starch is your best friend for handling.
Ingredients
- 1 ½ cups (8oz/225g) vanilla ice cream
- 1 cup (5½oz/160g) sweet glutinous rice flour
- 1/4 cup (2oz/57g) granulated sugar
- 1 cup (8oz/225ml) water
- A few drops of red food coloring (optional)
- Cornstarch for dusting (or potato starch)
Ingredient Notes & Substitutions
Mochiko vs. Shiratamako: Both are glutinous rice flour, but they behave a little differently. Mochiko is the common grocery-store option in the US, while Shiratamako tends to give a smoother, more elastic chew, the kind that feels almost “silky” on the teeth.
Glutinous rice flour: Regular rice flour will not give you mochi, it will give you disappointment. The bag should say “sweet” or “glutinous,” and that’s what builds the stretchy Japanese dessert texture we’re after.
Sugar: Sugar isn’t only there for sweetness. It helps the sweet rice dough stay softer once frozen, so you don’t end up with a casing that turns tough at the edges after a day or two.
Cornstarch vs. potato starch: Cornstarch is the usual in American kitchens, and it works beautifully for dusting. Potato starch feels a touch silkier on the surface, and either one keeps the dough from grabbing your rolling pin like glue.
Food coloring (optional): A few drops can give that cute blush tone you see in store-bought mochi. I keep it subtle, just enough to hint at strawberry vibes without changing the flavor.
How to Make Mochi Ice Cream recipe
Pre-freeze the ice cream cores
- Line a small tray with parchment paper.
- With a small ice cream scoop or spoon, portion twelve 2 tablespoon-sized scoops of ice cream (about.75oz /20g) onto the tray, then get them into the freezer so they can firm up hard.
Cook the mochi dough in the microwave
- In a large microwave-safe bowl, combine the sweet rice flour, sugar, and water. Cover with plastic wrap and microwave for 1 minute.
- Whisk to smooth out lumps, cover again, and microwave for another 1 minute.
- Dip a rubber spatula in water, then stir again with the spatula. Skip the whisk now, because the mixture turns seriously sticky.
- Cover once more and microwave for another 30 seconds. The dough should look glossy and sticky, shifting from opaque white to a slightly yellow, translucent dough. Stir in the food coloring now if using, until evenly blended.
Roll, chill, and cut the wrappers
- Lay a large sheet of parchment paper on the counter and dust it generously with cornstarch (or potato starch).
- Using the wet spatula, scrape the dough onto the starch, then dust the top with more starch.
- Roll the dough into a rectangle no less than 1/4 inch thick (about 12x14inches/30x35cm), dusting the top and bottom as you go so it doesn’t cling.
- Set the parchment on a cookie sheet and refrigerate for 30 minutes, this rest makes the dough easier to handle.
- Cut circles using a 3 ¾ inch (9½ cm) cutter.
Wrap and freeze until set
- Pick up one dough circle and brush off excess cornstarch from both sides, especially where you’ll seal.
- Working quickly, place one scoop of ice cream in the center with the flat side facing you. Press the edges together around the ice cream and squeeze firmly to seal.
- Wrap each mochi in cling wrap and return seam-side down to the freezer to set, an egg carton can keep them upright. Repeat with the remaining dough circles and ice cream, then freeze at least 2 hours until totally firm.
- When ready to eat, let the mochi sit out for a few minutes to soften slightly.
- Store in an airtight container in the freezer for up to 1 week.
The Secret to Mochi Mastery

Mochi looks playful, but it rewards a calm, confident hand. Once you understand hydration, temperature, and timing, your sweet rice dough becomes predictable, and that’s when the magic happens.
Traditional steaming (no microwave)
If you don’t use a microwave, steam the covered mixture in a lined steamer basket for 15 to 20 minutes, then stir until smooth and sticky. That old-school method is rooted in Japan’s traditional dietary cultures where mochi and rice crafts go hand in hand.
The science of dough hydration
Too brittle usually means under-hydrated or over-dusted, and it will crack when you stretch it. Too runny usually means under-cooked, and the dough never reaches that translucent state that signals the starches have properly gelled.
This is the same “chewy but workable” balancing act you see in snacks like rice paper dumplings, where moisture and heat decide whether you get tender bounce or a stiff bite. If your dough feels off, give it a moment, a light dusting, and let texture guide you.
Temperature control while wrapping
The best working window is dough that’s cool enough to touch but still elastic. If the dough is warm, the ice cream will melt on contact, and if the dough is too cold, it tightens up and resists sealing.
When I want ultra-neat shapes, I keep most circles chilled and only pull a few at a time. That way the wrappers stay cooperative, and the ice cream stays confidently frozen.
Pro Tips & Troubleshooting
Pro Tips
- Use a wet rubber spatula whenever you touch the dough, dry tools grab and tear it.
- Wrap only one ice cream portion at a time, the rest should stay in the freezer.
- Dust cornstarch like powdered wigs at a reenactment, generous is correct.
- Roll on parchment paper so you can lift, slide, and chill without sticking drama.
- A silicone mold makes denser portions that melt slower and wrap cleaner.
Common Mistakes to Avoid
- Brushing off too much starch before rolling, the dough can glue itself down.
- Not brushing off enough starch before sealing, the seam won’t bond tightly.
- Using regular rice flour instead of sweet glutinous rice flour like Mochiko.
- Stopping the microwave early, the dough must turn slightly translucent.
- Mixing with cold water, room temperature helps even hydration.
A pinch of sea salt is my quiet upgrade for deeper flavor. If you’re curious about different mineral salts, the celtic salt trick explains why some salts taste rounder and less harsh.
Serving & Storage Recommendations

How to Serve
I love serving mochi ice cream on a chilled plate, it buys you a little extra time before they soften. Hot green tea, like sencha or matcha, is a classic pairing because the warmth makes the sweetness feel more refined.
The “5-minute rule” is real, let it sit a few minutes so the mochi turns squishy again. If you enjoy cafe-style pairings, a dirty matcha latte brings earthy bitterness that plays beautifully with vanilla.
Storage & Make-Ahead Tips
Wrap each piece in cling wrap before freezing, then tuck them into an airtight container to prevent freezer burn. For the best chew, I aim to eat them within 1 week, after that the mochi can start to firm up and lose that tender bounce.
If you’re planning a full meal, something light and crisp beforehand keeps the dessert feeling special. A bowl of Asian cucumber salad brings a cool, savory contrast that makes the mochi taste even creamier.

Mochi Ice Cream Recipe
Equipment
- Small tray
- Parchment paper
- Small ice cream scoop or spoon
- Freezer
- Large microwave-safe bowl
- Plastic wrap
- whisk
- Rubber spatula
- Rolling Pin
- Cookie sheet
- Refrigerator
- 3 3/4 inch (9 1/2 cm) cutter
- Cling wrap
- Airtight container
Ingredients
- 1 1/2 cups vanilla ice cream 8oz/225g
- 1 cup sweet glutinous rice flour 5 1/2oz/160g
- 1/4 cup granulated sugar 2oz/57g
- 1 cup water 8oz/225ml
- red food coloring a few drops (optional)
- cornstarch for dusting (or potato starch)
Instructions
Pre-freeze the ice cream cores
- Line a small tray with parchment paper.
- Portion twelve 2 tablespoon-sized scoops of ice cream (about .75oz/20g) onto the tray, then freeze until firm and hard.
Cook the mochi dough in the microwave
- In a large microwave-safe bowl, combine the sweet rice flour, sugar, and water. Cover with plastic wrap and microwave for 1 minute.
- Whisk to smooth out lumps, cover again, and microwave for another 1 minute.
- Dip a rubber spatula in water, then stir again with the spatula (skip the whisk now because it turns very sticky).
- Cover once more and microwave for another 30 seconds. The dough should look glossy and sticky, shifting from opaque white to slightly yellow and translucent. Stir in the red food coloring now if using, until evenly blended.
Roll, chill, and cut the wrappers
- Lay a large sheet of parchment paper on the counter and dust it generously with cornstarch (or potato starch).
- Using the wet spatula, scrape the dough onto the starch, then dust the top with more starch.
- Roll the dough into a rectangle no less than 1/4 inch thick (about 12×14 inches/30×35 cm), dusting the top and bottom as you go so it doesn’t cling.
- Set the parchment on a cookie sheet and refrigerate for 30 minutes to make the dough easier to handle.
- Cut circles using a 3 3/4 inch (9 1/2 cm) cutter.
Wrap and freeze until set
- Pick up one dough circle and brush off excess cornstarch from both sides, especially where you’ll seal.
- Working quickly, place one scoop of ice cream in the center with the flat side facing you. Press the edges together around the ice cream and squeeze firmly to seal.
- Wrap each mochi in cling wrap and return seam-side down to the freezer to set (an egg carton can keep them upright). Repeat with remaining dough circles and ice cream, then freeze at least 2 hours until totally firm.
- When ready to eat, let the mochi sit out for a few minutes to soften slightly.
- Store in an airtight container in the freezer for up to 1 week.
Notes
Nutrition
Conclusion
Once you nail the silicone sphere pre-freeze and learn to trust that translucent dough cue, homemade mochi ice cream stops feeling like a project and starts feeling like a flex. Keep the flavors simple the first time, then play with matcha, ube, chocolate, or dairy-free ice cream when you’re ready.
When my kitchen is full of little wrapped bundles, I always think, this is the kind of treat that turns an ordinary weeknight into something worth lingering over.
Frequently Asked Questions
What is the best flour for mochi ice cream?
Use sweet glutinous rice flour, often sold as Mochiko, or Shiratamako for an even smoother, more elastic texture. Regular rice flour will not create the chewy structure that mochi needs.
How do I prevent the mochi from sticking to my hands?
Dust generously with cornstarch (or potato starch) and keep a rubber spatula wet when handling the dough. Also brush off excess starch right before sealing so the seam can stick.
Can I make the mochi dough ahead of time?
I don’t recommend making the dough far in advance, because it firms up and becomes harder to stretch cleanly. The best workflow is chilling it for 30 minutes as written, then cutting and wrapping right away.
Why is my mochi tough or hard after freezing?
This usually comes from not enough sugar for tenderness, exposure to freezer air, or storing unwrapped pieces. Wrap each mochi in cling wrap, keep them airtight, and eat within 1 week for the softest chew.
How long should I let mochi ice cream sit out before eating?
A few minutes at room temperature is ideal. That short rest brings back the signature squish without letting the center melt.
Is mochi ice cream gluten-free?
Glutinous rice is naturally gluten-free, the “glutinous” name refers to texture, not wheat gluten. For extra peace of mind, it’s helpful to remember that all rice (in its natural form) is gluten-free, but always confirm your specific brand’s cross-contact labeling.