Skip to content
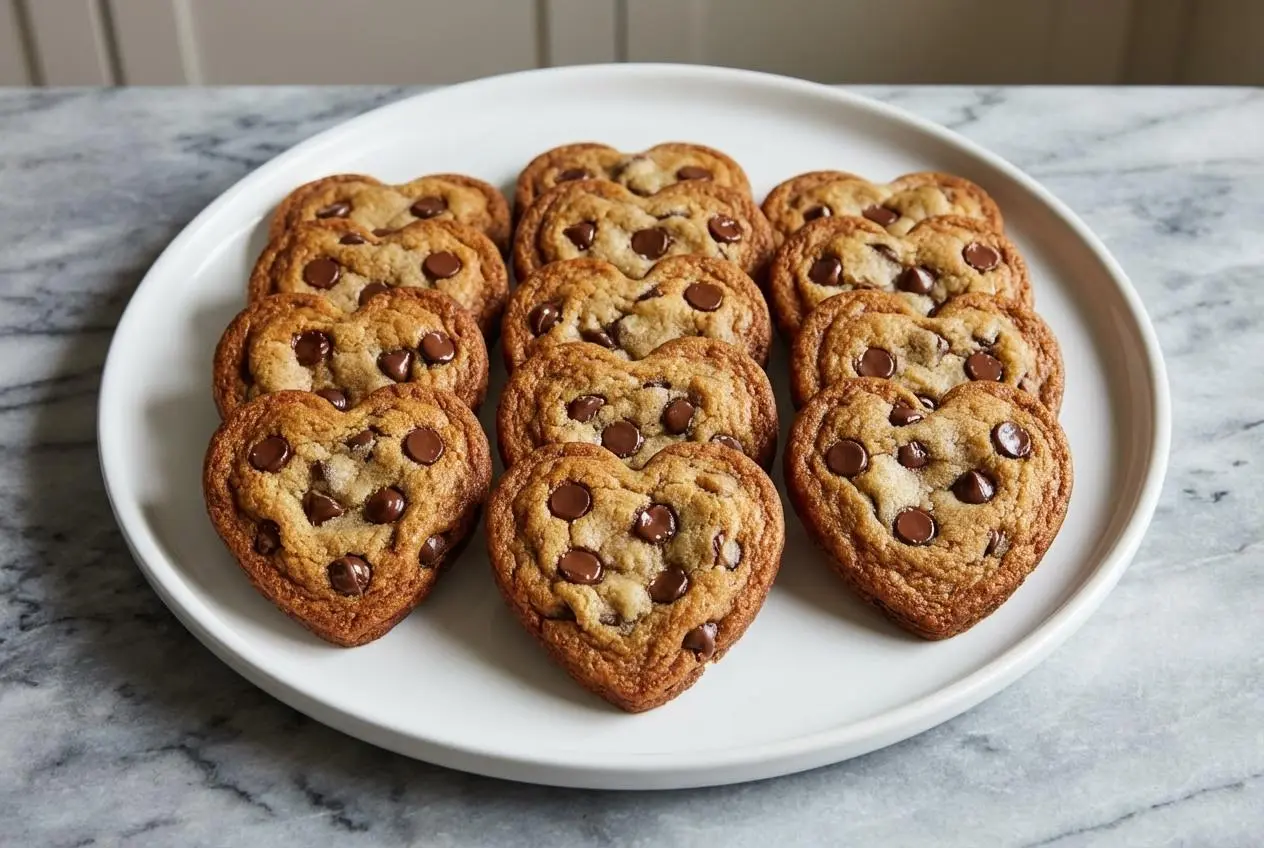
There’s something special about setting a plate down in the middle of a cozy moment, a little homemade love that says, “I thought of you.” That’s exactly the energy I want when I bake Heart Shaped Chocolate Chip Cookies for Valentine’s Day, anniversaries, or just because the week deserves a sweet reset.
These brown butter cookies are rich, deeply flavorful, and built for clean, sharp shapes. The secret for the best flavor and perfect hearts is simple, but it works like magic, so keep reading.
Why You’ll Love This Recipe
Unforgettable Flavor: The brown butter brings a deep, nutty, caramel-like richness that instantly makes these Chocolate Chip Cookies feel more “bakery” than basic.
The Secret Twist: I add espresso powder in a small amount, and it doesn’t taste like coffee. Instead, it acts as a flavor enhancer that makes the chocolate feel louder and more layered.
Soft and Chewy Every Time: When you nail the bake, you get that classic soft and chewy bite, with pools of melty semisweet chocolate chips that turn gooey at the center.
Foolproof Heart Shapes: My favorite part is the heart-shaped technique. It’s designed to solve the usual frustration of cookies spreading, blurring, or losing their edges.
Ingredients and Substitutions

These heart-shaped cookies come together with pantry staples, plus two flavor-forward upgrades: brown butter and a touch of espresso powder.
Ingredients
- 2¼ cups all-purpose flour
- 1 teaspoon baking soda
- ¾ teaspoon salt
- 1 cup unsalted butter, at room temperature
- ½ cup light brown sugar, packed
- ½ cup granulated sugar
- 2 teaspoons vanilla extract
- 2 large eggs, at room temperature
- 1½ cups semisweet chocolate chips
Ingredient Notes & Substitutions
Butter: Browning the butter is what turns this dough from “good” into deeply nutty, caramel-like cookie magic. If you are in a hurry, you can use room temperature butter, but the flavor will be less complex.
Chocolate: For a more interesting bite, try a mix of semi-sweet and dark chocolate chunks from a chopped bar. You will often get bigger melted pockets, which makes the hearts look even more irresistible.
Flour: all-purpose flour is ideal because it provides structure without making the cookies tough. For a gluten-free option, use a 1-to-1 gluten-free baking flour blend, and expect the texture to be slightly different but still delicious.
Vegan Option: For a vegan option, use vegan butter, vegan chocolate chips, and chia or flax eggs (1 tbsp ground chia + 3 tbsp water per egg, rested until gelled) so the dough can hold together like the original.
How to Make Heart Shaped Chocolate Chip Cookies
Warm Up and Prep the Components
- First, preheat your oven to 350°F (175°C) and line a baking sheet with parchment paper so the cookies release cleanly. Set the sheet aside while you mix, because once the dough is ready, you want everything to move smoothly.
- In a medium bowl, whisk together the all-purpose flour, salt, and baking soda until the dry ingredients look evenly speckled. This step matters because it distributes the baking soda so you do not get any bitter, uneven flavor pockets later.
- Brown the butter in a saucepan over medium heat, letting it melt, foam, and then develop brown flecks and a nutty aroma. Pour it into a heatproof bowl and cool for about 10-15 minutes, until it feels warm, not hot, so it creams properly with the sugars.
Build the Dough (Without Overmixing)
- In a large bowl, use an electric mixer to beat the slightly cooled brown butter, light brown sugar, and granulated sugar until the mixture is well combined. It will look less fluffy than when using solid butter, and that is normal, not a mistake.
- Mix in the eggs and vanilla extract just until everything disappears into the batter. You are looking for a smooth, glossy base, not a long mixing session.
- Gradually add the dry mixture to the wet ingredients, mixing on low speed just until you no longer see flour streaks. Overmixing is the enemy of that soft and chewy texture, so stop as soon as the dough comes together.
- Fold in the semisweet chocolate chips with a spatula so they stay intact and evenly distributed.
Scoop, Bake, and Cut Hearts
- Scoop about 2 tablespoons of dough per cookie onto the lined baking sheet, leaving 2-3 inches between each mound to account for spreading. Each cookie should look like a chunky little dome so the hearts have something sturdy to hold their shape.
- Bake for 9-11 minutes at 375°F (190°C), until the edges are slightly golden brown while the centers still look a touch underbaked. The cookies should smell buttery and toasty, and the middle should still have a soft, set look.
- Right after you pull the pan from the oven, press a heart-shaped cookie cutter firmly into each warm cookie to cut the hearts out. Work quickly while the cookies are hot and pliable, because letting them cool even a few extra minutes can make the edges tougher to shape.
Cool the Cookies and Save the Scraps
Let the cut cookies and the surrounding cookie scraps cool on the baking sheet for 5-7 minutes, then transfer the hearts to a wire rack to cool completely. Those first minutes on the tray help them firm up without tearing.
My Secrets for the Best Flavor and Shape

The Magic of Brown Butter: Browning the butter toasts the milk solids, which builds a richer, caramel-like flavor through the Maillard reaction. It is the reason your kitchen smells like toasted nuts and warm sweetness instead of just “butter.” If you want the science in plain terms, Maillard reaction is the key idea behind that depth.
Espresso’s Supporting Role: With just 1 teaspoon of espresso powder, the cookies do not taste like coffee. It works as a flavor enhancer, helping the chocolate taste more chocolatey and less one-note.
The Cut After Baking Advantage: Cutting immediately after baking is how you get sharp heart edges while keeping the centers soft and chewy. If you cut before baking, the dough can spread in the oven and soften the outline, which is where hearts go from “perfect” to “mysteriously abstract.”
Measure Flour Correctly: Dry, cakey cookies usually happen when flour gets packed in. I measure using a ‘spoon and level’ method, which helps prevent excess flour that steals chew.
The Great Debate: Cutting Cookies Before vs. After Baking
Method 1: Cutting After Baking (The Recommended Method)
Pros: This method gives you the sharpest, most consistent hearts and keeps the center tender. It also supports no-chill cookie dough, because the cookies themselves do the setting.
Cons: The clock starts as soon as the pan comes out of the oven. You have to cut while they are hot and pliable, and yes, you will have leftover cookie scraps.
Method 2: Cutting Before Baking
Pros: You avoid handling hot cookies, so the process feels calmer. It is also a traditional approach for many bakers.
Cons: You typically need chilling for at least 30-60 minutes to limit spreading, and shapes can still distort in the oven. Even when it works, the edges are less consistently crisp than cutting hot cookies.
Method 3: The Sheet Pan Method
Pros: It is efficient when you want a large batch quickly. You can also use it for bars and thicker bakes.
Cons: Pressing dough into a sheet and then cutting can lead to less uniform hearts, and it is better suited to cookie bars than clean, individual shapes.
From Scraps to Stars: What to Do With Cookie Cutouts
In my kitchen, cookie scraps are not leftovers, they are the bonus course. Once you taste a cookie truffle made from cutouts, you will never stress about heart-shaped edges again.
Ice Cream or Yogurt Topping: Crumble the scraps over your favorite dessert, and let the gooey chocolate and buttery crumbs do the rest.
Cookie Crumb Crust: Pulse scraps into fine crumbs, mix with a little melted butter, and press into a pie plate for a quick cheesecake or cream pie base.
Cookie Truffles: Stir scraps with a bit of cream cheese or frosting, roll into balls, chill, then dip in melted chocolate for an elegant, bite-sized treat.
Pro Tips and Troubleshooting
Expert Tips for Success
- For Gooey Chocolate Pools: Press a few extra chocolate chunks or chips onto the tops of the dough mounds right before baking.
- Festive Touch: Add Valentine’s Day sprinkles to the dough or on top before baking for an instant party look.
- Room Temperature is Key: Use room temperature ingredients, especially eggs, so the dough comes together smoothly and bakes evenly.
- Brown Butter Flavor: Let the browned butter cool until it is warm to the touch. Too hot and it can mess with the dough texture.
Common Mistakes to Avoid
- Don’t Overmix: Once flour goes in, mix only until streaks disappear. Overmixing develops gluten and makes cookies tough instead of soft and chewy.
- Don’t Use Hot Melted Butter: After browning, the butter needs a short cool-down. If it is too hot, it can melt sugar faster than the dough can stabilize, leading to greasy, overly spread cookies.
- Don’t Wait to Cut: For the cut-after-baking method, timing is everything. Cut the hearts right out of the oven while the cookies are hot and pliable.
Serving, Gifting, and Storage

Serving and Gifting Ideas
Serve these hearts warm, because the chocolate softens beautifully and the butter aroma is at its peak. A scoop of vanilla ice cream turns them into the kind of dessert people talk about for days, and pairing them with homemade lemon gelato can be a bright, tangy twist.
For a sweet, social moment, build cookie sandwiches with frosting or ice cream in the middle. During Valentine’s Day, I also love packaging them in clear cellophane bags tied with a festive ribbon, because homemade food deserves a little ceremony.
If you want a simple filling idea, sugar cookie icing is a great match for the rich brown butter base.
How to Store and Make Ahead
To Store Baked Cookies: Keep them in an airtight container at room temperature for up to 5 days. Add a slice of bread to help keep them soft, because cookies like company just as much as bread does.
To Make Dough Ahead: You can refrigerate the dough in an airtight container for up to 3 days. Scoop and bake directly when ready, adjusting time slightly if dough is very cold.
To Freeze: Freeze dough balls for up to 3 months and bake from frozen, adding a few extra minutes. You can also freeze baked, cut cookies once they have cooled completely.

Heart Shaped Chocolate Chip Cookies
Equipment
- Baking sheets
- Parchment paper
- Saucepan
- Large bowl
- Electric mixer
- Spatula
- Heart-shaped cookie cutter
- Wire rack
Ingredients
- 2¼ cups all-purpose flour
- 1 teaspoon baking soda
- ¾ teaspoon salt
- 1 cup unsalted butter, at room temperature
- ½ cup light brown sugar, packed
- ½ cup granulated sugar
- 2 teaspoons vanilla extract
- 2 large eggs, at room temperature
- 1½ cups semisweet chocolate chips
Instructions
Warm Up and Prep the Components
- Preheat your oven to 375°F (190°C). Line a baking sheet with parchment paper.
- In a medium bowl, whisk together the all-purpose flour, baking soda, and salt to ensure even distribution.
- In a light-colored saucepan over medium heat, melt the butter. Continue to cook, swirling the pan occasionally, until it foams and then develops brown flecks and a nutty aroma. Immediately pour into a large heatproof bowl and let it cool for 10-15 minutes, until warm but not hot.
Build the Dough
- Add the light brown sugar and granulated sugar to the bowl with the cooled brown butter. Using an electric mixer, beat on medium speed until well combined. The mixture will look less fluffy than when using solid butter; this is normal.
- Add the eggs and vanilla extract, mixing on low speed just until incorporated and the batter is smooth.
- Gradually add the dry ingredient mixture to the wet ingredients, mixing on low speed only until the flour streaks disappear. Do not overmix.
- Using a spatula, gently fold in the semisweet chocolate chips until they are evenly distributed throughout the dough.
Scoop, Bake, and Cut Hearts
- Scoop mounds of dough (about 2 tablespoons each) onto the prepared baking sheet, leaving 2-3 inches of space between them for spreading.
- Bake for 9-12 minutes, or until the edges are golden brown and the centers look slightly underbaked and soft.
- As soon as you remove the pan from the oven, immediately and firmly press a heart-shaped cookie cutter into each warm cookie to cut out the shapes. Work quickly while the cookies are hot and pliable.
Cool the Cookies
- Let the cut heart cookies and the surrounding scraps cool on the baking sheet for 5-7 minutes to firm up. Then, carefully transfer the hearts to a wire rack to cool completely.
Notes
Nutrition
Conclusion
These Heart Shaped Chocolate Chip Cookies deliver that dream combo, deep brown butter flavor, chocolate that tastes even more chocolaty thanks to espresso powder, and a reliable cut-and-heart method. The result is rich, soft and chewy cookies with clean edges that look as good as they taste.
I love making a batch for Valentine’s Day, then experimenting with small add-ins or using the cookie scraps for a second treat. Make them once, and you will want to keep the heart-shaped cutter on the counter.
Frequently Asked Questions
What’s the best method to get a perfect heart shape, cutting before or after baking?
My cookies spread too much and became blobs. How can I fix this?
Can I make this cookie dough ahead of time and store it?
How should I store the finished heart-shaped cookies to keep them fresh?
Can I make these cookies without an electric mixer?
What are some fun variations or add-ins for these Valentine’s cookies?