Skip to content
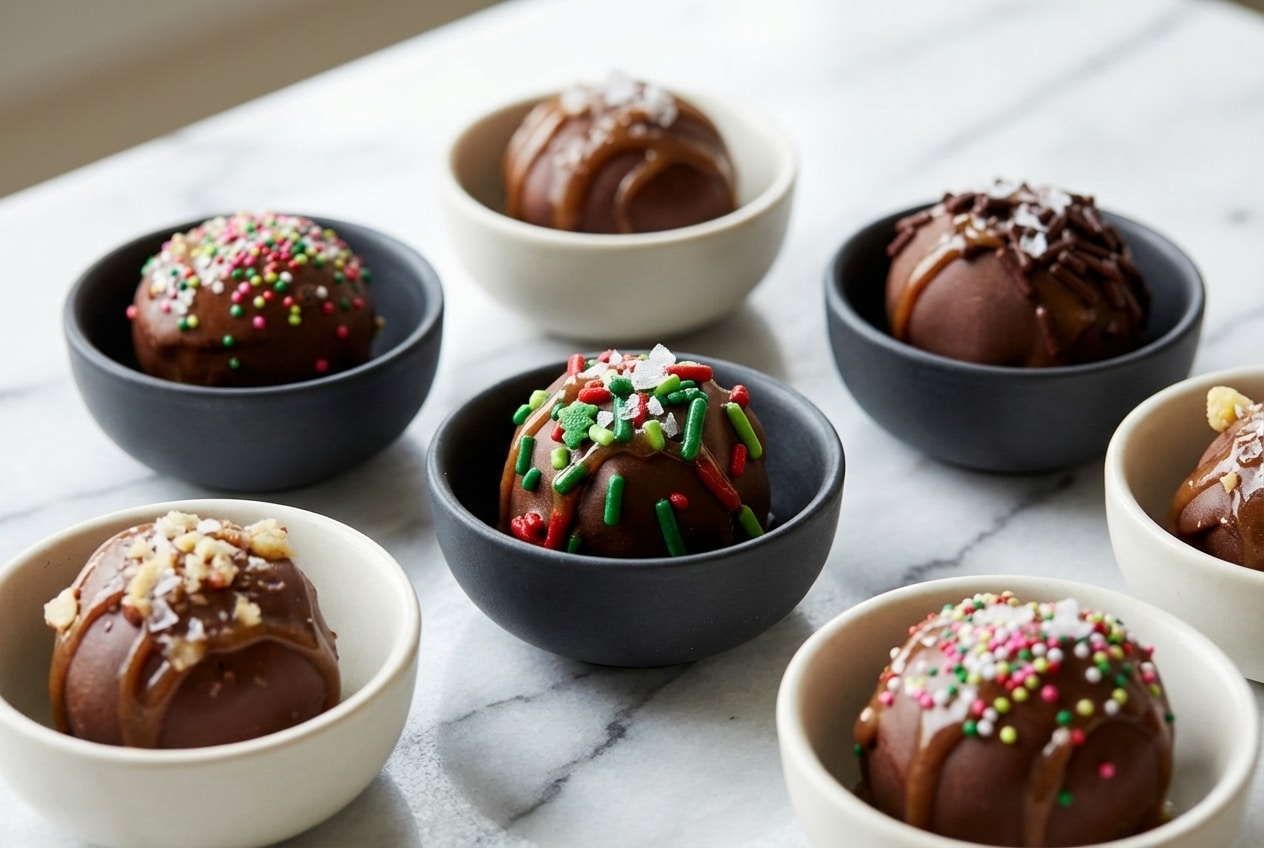
In my kitchen, brownie truffles are what I make when I want “holiday-party pretty” without spending all day tempering chocolate like it’s a pastry exam. You start with a humble pan of brownies, then you turn that fudgy center into bite-size, ganache-style gems that feel like they came from a boutique chocolate shop.
These brownie truffles lean into one chef move I swear by, brown butter plus a whisper of flaky sea salt. It’s the kind of upgrade that makes boxed mix taste like you meant it.
Why You’ll Love This Recipe
Brown Butter Depth: I swap the usual melted butter for beurre noisette, and suddenly the brownie base tastes toasted, nutty, and less one-note sweet.
Sea Salt “Flavor Bridge”: A tiny flake of Maldon-style sea salt wakes up the cocoa, and your palate reads the chocolate as darker and richer.
Mix Convenience, Pro Finish: Using a fudge brownie mix keeps it easy, then chilling, clean rolling, and a smooth dip give you that polished candy-shop look.
Better Texture Control: The underbaked, fudgy approach improves emulsification, so the center mashes into a true cookie-dough consistency instead of dry crumbs.
Ingredients and Substitutions

These brownie truffles come down to a fudgy brownie base and a clean chocolate shell. Keep the mix chewy, keep the chocolate smooth, and the rest is just a little patience while things cool and set.
Ingredients
- 1 box fudge brownie mix (18 oz.)
- eggs, melted butter and water (according to box)
- 12 oz. chocolate candy melts or chocolate chips
- 1 teaspoon coconut oil (if using chocolate chips)
- sprinkles
Ingredient Notes & Substitutions
Fudge brownie mix: Stick with “Fudge” or “Chewy” if you can, cake-style brownies bake up airy and crumbly, and they fight you when you try to roll neat balls.
Melted butter: Even though the box says “melted butter,” I take the extra minute to brown it first, beurre noisette brings toasted milk solids that make the chocolate taste more grown-up.
Dutch-process cocoa: If you ever make the brownies from scratch, Dutch-process cocoa gives a smoother, deeper chocolate note, especially nice when you want that bakery-style profile.
Chocolate candy melts or chocolate chips: Melting wafers are the easiest path to a tidy shell, chocolate chips taste great but can be thicker, so that coconut oil helps loosen it into a dip-friendly flow.
High-quality bar chocolate: It’s delicious, but it’s a different game, you’ll want to temper it or expect a softer set and possible streaking.
Gluten-free option: A gluten-free fudge brownie mix usually works well here, as long as it bakes up dense and not cakey.
How to Make brownie truffles
Brown the Butter, Prep the Pan
- Heat the butter your box calls for in a small pan until it foams, then watch for golden-brown flecks and a warm, nutty aroma, that’s beurre noisette, and it’s worth hovering for.
- Spray an 8″x8″ or 9″x13″ baking dish with nonstick cooking spray, and if you like lifting the slab out cleanly, line it with parchment paper so nothing sticks or tears.
Bake, Then Cool Completely
- Mix and bake the brownies according to the directions on the box, aiming for fudgy instead of dry, you want that dense middle that smells deeply chocolatey.
- Let the brownies cool in the baking dish for 1 hour, warm brownies feel tempting, but they turn greasy and gummy when you mash them too soon.
Mash Into “Dough,” Scoop and Roll
- If you want the smoothest truffle centers, trim away the edges, especially the corners, those bits bake up drier and can leave little crunchy patches in the roll.
- Mash the brownies with a fork until the mixture looks like cookie dough, soft, cohesive, and scoopable, with no dry crumbs hiding at the bottom.
- Scoop portions using a tablespoon-sized cookie scoop, then roll between your palms until round and glossy, like a dense little chocolate snowball.
- Set the balls on a cookie sheet lined with parchment paper or wax paper, giving them a little space so they don’t glue themselves together.
Chill, Dip, Decorate
- Freeze for 15 minutes, the truffles should feel firm and chilled but not frozen solid, this is the sweet spot that helps prevent cracking later.
- Put the chocolate candy melts or chocolate chips in a microwave-safe bowl, and stir in 1 teaspoon coconut oil if using chocolate chips, it helps the coating fall in a smoother ribbon.
- Microwave for 30 seconds, stir, then heat another 30 seconds, continuing in 15-second increments and stirring until the chocolate looks silky and fully melted.
- Stop heating when it’s almost there and keep stirring, residual heat finishes the job and protects the chocolate from scorching or turning thick.
- Dip each chilled ball into the melted chocolate, lift it with a fork, and tap gently to shake off excess so you don’t get big “feet” puddles underneath.
- Add sprinkles immediately before the coating sets, then let the truffles rest on the lined sheet until the shell is completely firm to the touch.
The Secret to Professional Results

The prettiest brownie truffles come down to temperature control, especially once chocolate enters the chat. If you’ve ever opened a container and found pale streaks, that’s chocolate bloom, cocoa butter or sugar rising to the surface after rough temperature swings.
The simplest prevention is steady storage and gentle transitions, let the coated truffles set fully, then keep them in an airtight container away from heat and sunlight. When I’m using higher-end chocolate instead of melting wafers, I’m extra careful because untempered chocolate shows bloom more easily.
The underbaking technique matters more than most people think. A slightly fudgy pan emulsifies into a uniform center, because the fats and cocoa solids blend smoothly instead of crumbling apart.
Brown butter is the chef trick that makes boxed mix taste intentional. Those toasted milk solids add deep, nutty aromatics that echo chocolate’s roasted notes, and that’s why a pinch of flaky salt suddenly makes the cocoa taste louder.
When you’re choosing cocoa for scratch baking, the alkalization process and pH levels help explain why Dutch-process tastes smoother. In plain terms, it’s less sharp, and it plays beautifully with beurre noisette.
Pro Tips & Troubleshooting
Pro Tips
- Brown the butter your box calls for, and let it cool slightly so it doesn’t scramble the eggs when mixing.
- Discard or snack on the four corner pieces, they’re usually too dehydrated to roll velvety-smooth.
- A food processor gives the most uniform interior, a few pulses turns the brownie into a professional, fine-crumb “dough.”
- If you need a binder, use block-style cream cheese, whipped tubs can make the center loose and weepy.
- Tap the fork gently after dipping, less excess chocolate means cleaner bottoms and a thinner, snappier shell.
- A thin, spicy-sweet drizzle adds contrast, and my favorite is hot honey over the set chocolate. Keep it light so the shell stays crisp.
Common Mistakes to Avoid
- Dipping truffles that are frozen solid, the thermal shock can crack the coating as it sets.
- Over-baking the brownies, dry brownies mash gritty and won’t hold together as cleanly.
- Adding too much frosting or cream cheese, you’ll get a mushy center instead of dense and fudgy.
- Overheating chocolate in the microwave, it can seize or turn thick, and then dipping becomes a battle.
Serving & Storage

Creative Serving Ideas
I love tucking each truffle into mini metallic cupcake liners, it instantly looks bakery-level on a platter. A quick drizzle of contrasting chocolate, like white over dark, also hides tiny imperfections and feels fancy with almost no effort.
They shine on a dessert spread with berries and nuts, especially raspberries and pecans for that tart-crunch balance. For a playful party layout, a charcuterie board style setup gives you great ideas for building a shareable platter.
Storage & Make-Ahead Instructions
At room temperature, keep them airtight for up to 3 days, as long as you didn’t add a dairy binder like cream cheese. Refrigerated, they hold well for 5 to 7 days, and in the freezer they’re happy for up to 2 months.
To prevent condensation, I move them from fridge to counter still covered. After 20 to 30 minutes, the temperature evens out and the shells stay shiny instead of sweating.
Summary of the Ultimate Truffle Experience
This is the little magic trick I come back to, a simple box becomes a tray of brownie truffles with a gourmet backbone. Brown butter brings that toasted, hazelnut-like warmth, and flaky salt makes the chocolate taste deeper and less sugary.
If you like playing with flavors, the mocha version with espresso powder is bold, and the boozy version with Kahlua or bourbon is pure grown-up fun. When you’re in the mood for another way to use brownie bases, a brownie strawberry trifle gives that same chocolate comfort in a layered, spoonable form.

Fudgy Brownie Truffles With Brown Butter
Equipment
- Small saucepan
- 8×8 or 9×13 baking dish
- Parchment paper
- Cookie scoop
- Microwave-safe bowl
Ingredients
- 1 box fudge brownie mix (18 oz.)
- eggs, melted butter and water (according to box)
- 12 oz. chocolate candy melts or chocolate chips
- 1 teaspoon coconut oil (if using chocolate chips)
- sprinkles
Instructions
Brown the Butter, Prep the Pan
- Heat the butter required by your brownie mix in a small pan over medium heat. Allow it to foam until you see golden-brown flecks and smell a nutty aroma, then remove from heat.
- Preheat your oven as directed on the box and spray an 8×8 or 9×13 inch baking dish with nonstick spray. Line the dish with parchment paper for easy removal.
Bake, Then Cool Completely
- Mix and bake the brownies following the box directions using your browned butter. Aim for a fudgy, dense center rather than a dry crumb.
- Let the baked brownies cool completely in the dish for at least 1 hour to prevent them from becoming greasy during the assembly phase.
Mash Into Dough, Scoop and Roll
- Trim away any dry edges or corners from the brownies. Mash the remaining fudgy centers with a fork until the mixture reaches a soft, cohesive cookie-dough consistency.
- Use a tablespoon-sized cookie scoop to portion the dough, then roll each piece between your palms until they are round and glossy.
- Place the rolled balls onto a parchment-lined cookie sheet with enough space between them so they do not stick together.
Chill, Dip, Decorate
- Place the sheet in the freezer for 15 minutes until the truffles are firm and chilled but not frozen solid.
- Melt the chocolate candy melts or chips in a microwave-safe bowl in 30-second increments, stirring in 1 teaspoon of coconut oil if using chocolate chips for a smoother flow.
- Dip each chilled ball into the melted chocolate using a fork. Tap the fork gently on the edge of the bowl to remove excess chocolate before placing the truffle back on the parchment.
- Immediately add sprinkles while the coating is wet and let the truffles rest until the shells are completely firm to the touch.
Notes
Nutrition
Frequently Asked Questions
Do brownie truffles need to be refrigerated?
If you use cream cheese or frosting as a binder, refrigerate them and aim to finish within 5 to 7 days. If you rely on the fudgy, underbaked brownie texture with no dairy binder, they can sit at room temperature in an airtight container for up to 3 days.
How do I get a perfectly smooth chocolate coating?
Chill the balls so they’re firm but not frozen, then dip in fully melted, glossy chocolate. Candy melts are naturally smooth, and for chocolate chips the 1 teaspoon coconut oil helps thin the coating so it settles sleek instead of thick and bumpy.
Can I use a cake-style brownie mix?
It’s not my pick for brownie truffles. Cake-style brownies are lighter and more crumbly, while a fudge brownie mix has the fat-to-flour balance that gives you the “stickiness” needed to roll clean balls.
Why is my brownie mixture too sticky to roll?
This usually means the brownies were very underbaked, or too much binder was mixed in. Chill the mashed brownie mixture in the fridge for 30 to 60 minutes so the fats firm up, then scoop and roll again.
Can I use store-bought pre-made brownies for this?
Yes, as long as they’re dense and fudgy, not dry or cakey. If they seem a little stale around the edges, trimming first makes a huge difference in the final, velvety texture.
Why is my chocolate coating cracking after it dries?
Cracking usually comes from dipping balls that are too cold, especially if they’re frozen solid, because the shell sets too fast and fractures. Keep the freeze to 15 minutes, and dip when the centers feel chilled and firm, not rock-hard.
Do you have other bite-sized chilled desserts like this?
The appeal is the same, a small, handheld treat with a satisfying cold bite. Something like mochi ice cream scratches that same itch, especially when you want portioned sweets that hold their shape.