Skip to content
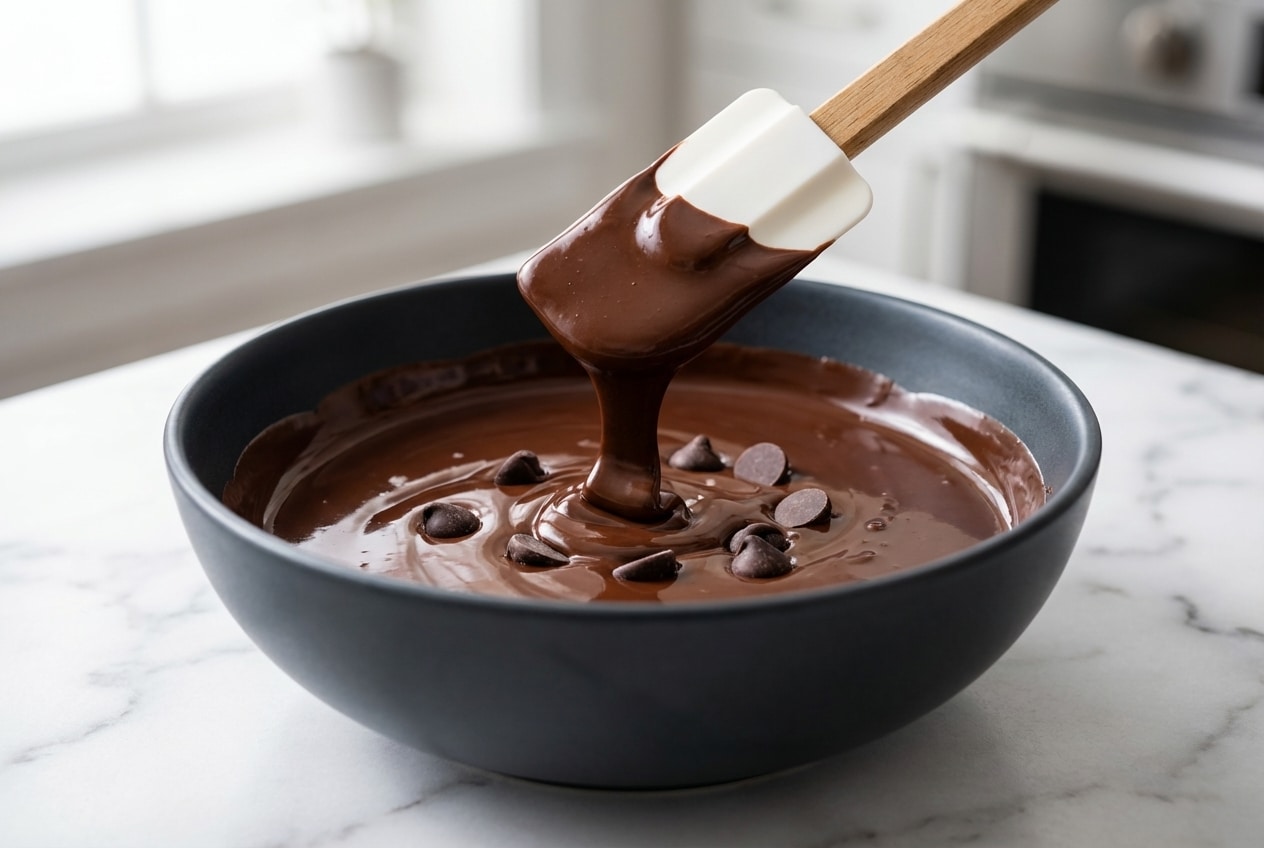
In my pastry kitchen, melted chocolate is the little detail that makes people think you trained somewhere fancy, even if you are just dipping strawberries on a Tuesday. The tricky part is that chocolate is moody, it hates moisture, and it burns faster than you think.
This guide on how to melt chocolate walks you through three reliable methods, plus my favorite “Reverse-Chip” trick for a glossy finish that sets with a cleaner snap. It is perfect for drizzling, coating, dipping, and any moment you want silky results without stress.
Why You’ll Love This Recipe
Glossy, professional finish: The Reverse-Chip Stabilization Method “seeds” stable cocoa butter crystals back into the melted chocolate, so it sets shinier and firmer than basic melting.
Choose your comfort zone: Microwave-safe bowl, double boiler, or a gentle water bath, you get a method that matches your kitchen and your patience.
Less scorched chocolate, more control: I rely on residual heat and frequent stirring so the emulsion stays smooth instead of turning dull or grainy.
Faster setting for dipping and drizzling: That little handful of reserved chocolate helps the whole bowl cool into a prettier, more stable finish.
Ingredients and Substitutions

You only need good chocolate and a bit of attention to heat. With one ingredient, the quality you choose is the flavor you will taste in every bite.
Ingredients
- 3 oz. bittersweet chocolate, chopped (or larger quantities as needed)
Ingredient Notes & Substitutions
Bittersweet chocolate: Bars and baking chocolate usually melt into a thinner, silkier fluid than chips, which makes them my first choice for dipping and drizzling.
Chocolate chips: Chips often include stabilizers so they hold their shape, so they can be slightly more resistant to melting into a very fluid texture, you can still use them, but expect a thicker flow.
Couverture chocolate: Couverture has more cocoa butter, so it melts especially smooth and glossy, it is wonderful when you want a luxe coating that pours easily.
Melting wafers: These are designed to melt predictably and set quickly, but the flavor is usually simpler than real chocolate, I keep them for big batches and kid parties.
Cocoa butter and labeling: When you are comparing bars, chips, and “white chocolate,” the legal definitions matter more than marketing, the FDA’s Standard of identity for cacao products explains what must be in chocolate.
How to Make how to melt chocolate
The “Reverse-Chip” Foundation
- Start by chopping your chocolate so the pieces are similar in size, this keeps melting even and prevents hot spots.
- Reserve 1/4 of the chopped chocolate and set it aside, this is your “seed” for later.
- Plan to melt the remaining 3/4 using one of the methods below, then you will stir in the reserved chocolate off the heat until the bowl looks glossy and perfectly smooth.
Method 1: Microwave (Quick & Easy)
- Put 3/4 of the chopped chocolate into a microwave-safe bowl, I like a wider bowl so stirring is easier and the heat spreads out.
- Microwave at regular power in 30-second bursts, the chocolate should look shiny at the edges but not bubbling.
- Stir briefly between each burst, scraping the sides and bottom so warmer chocolate coats the cooler pieces.
- Continue until it is evenly melted, usually around 90 seconds for 3 oz, you want it fluid, glossy, and lump-free.
- Take it out, then stir in the reserved 1/4 chocolate off the heat until it disappears and the surface looks satiny.
Method 2: Double Boiler (Gentle & Controlled)
- Set a metal bowl over a saucepan holding 1 inch of simmering water, the steam should be steady, not aggressively boiling.
- Make sure the bottom of the bowl does not touch the water, direct contact can scorch chocolate before it has a chance to melt evenly.
- Add 3/4 of the chocolate and stir as the bowl warms, you will smell a richer cocoa aroma as it starts to relax and go shiny.
- Watch the chocolate clinging to the sides of the bowl, it melts faster there and can overheat first.
- Once melted, lift the bowl off the heat and wipe any condensation from the bottom, then stir in the remaining 1/4 chocolate until smooth and glossy.
Method 3: Water Bath (Slow & Steady)
- Set a metal bowl directly into a skillet with about 1 inch water, the bowl should sit stable so it does not wobble while you stir.
- Bring the water to a simmer, then turn off the heat, this gives you gentle residual heat without the risk of scorching.
- Add 3/4 of the chocolate and let it melt gradually, stirring occasionally until it turns fluid and shiny.
- Remove from the warm water, dry the bowl’s bottom, and stir in the final 1/4 chocolate off the heat until it is perfectly smooth.
The Science of Perfectly Melted Chocolate

Chocolate is a delicate emulsion of cocoa solids, sugar, and cocoa butter, and the “silky” feeling comes from keeping that structure calm. Push it too hot and you risk scorching, plus the texture can turn thick and dull.
As a practical rule in my kitchen, dark chocolate can handle up to about 120°F, while milk and white chocolate should not exceed 110°F because of their higher sugar and milk solids. The Royal Society of Chemistry shares scientific melting points for different chocolates that line up with what pastry chefs see in real life.
Seizing is the other monster, even a tiny amount of moisture can make melted chocolate clamp up into a grainy paste. That is because a splash of water dissolves sugar on the surface, then the sugar grabs cocoa particles and clumps, breaking the smooth flow.
Pro Tips & Troubleshooting
Pro Tips
- Use the 80/20 rule, stop heating when chocolate looks 80% melted, then let residual heat finish the job while you stir.
- Keep everything bone-dry, bowls, spatulas, and even the underside of your double-boiler bowl.
- Choose your bowl wisely, metal responds faster to heat changes, glass holds heat longer and can overcook chocolate after microwaving.
- For dipping texture, a small amount of refined coconut oil can help it flow more smoothly and set with shine.
Common Mistakes to Avoid
- Long microwave blasts, chocolate overheats fast, short bursts keep you in control.
- Letting steam sneak into the bowl, condensation is enough to trigger seizing.
- Using a bowl that touches simmering water, direct heat creates scorch spots before the rest melts.
- Stirring in cold liquids like vanilla extract after melting, the temperature shock can make it clump.
Serving & Storage

Creative Serving Ideas
Fruit dipping is the classic, strawberries, orange slices, and dried apricots love a bittersweet coating that sets with a clean bite. When I want a dessert that looks layered and “chef-y,” melted chocolate adds a beautiful ribbon through a strawberry trifle without making it overly sweet.
That quick magic shell is a favorite, melted chocolate plus 1 teaspoon of refined coconut oil makes a glossy coating that hardens fast on ice cream. The crackly finish is especially fun over mochi ice cream, because the textures play together beautifully.
For drizzling, I use a fork and let thin threads fall back and forth over cookies or biscotti. A warm plate of ice cream toast looks instantly elegant with a shiny chocolate zigzag.
Storage & Make-Ahead Tips
If you have leftover melted chocolate, spread it thin on parchment paper and let it harden at room temperature. Once solid, break it into pieces and store airtight, then you can re-melt it gently the next time you need a quick drizzle.
Master the Melt
When you master how to melt chocolate, you stop fearing the bowl and start having fun with it. Between temperature control and the Reverse-Chip method, you get better shine, a cleaner snap, and chocolate that behaves when you dip or drizzle.
Play with different cocoa percentages and notice how the flow changes, then keep notes like a real chocolatier. The more you practice, the more “silky” becomes your default.

How To Melt Chocolate With The Reverse-chip Method
Equipment
- Microwave-safe bowl
- Saucepan
- Metal bowl
- Spatula
Ingredients
- 3 oz. bittersweet chocolate, chopped (or larger quantities as needed)
Instructions
The Reverse-Chip Foundation
- Chop the chocolate into pieces of similar size to ensure even melting and prevent the formation of hot spots.
- Separate the chopped chocolate, reserving 1/4 of it to use as a seed for stabilization later.
Method 1: Microwave
- Place 3/4 of the chopped chocolate into a wide, microwave-safe bowl for better heat distribution.
- Heat the chocolate at regular power in 30-second intervals, stirring briefly between each burst to mix the warmer edges with the cooler center.
- Continue the process until the chocolate is fully fluid and glossy, which usually takes about 90 seconds.
- Remove the bowl from the microwave and stir in the reserved 1/4 chocolate until it has completely melted and the surface looks satiny.
Method 2: Double Boiler
- Set a metal bowl over a saucepan containing 1 inch of simmering water. Ensure the bottom of the bowl does not touch the water to avoid scorching.
- Add 3/4 of the chocolate to the bowl and stir constantly as it warms until it is entirely melted and shiny.
- Lift the bowl away from the saucepan and wipe any condensation from the bottom of the bowl.
- Stir in the remaining 1/4 chocolate off the heat until the mixture is perfectly smooth and glossy.
Method 3: Water Bath
- Place a metal bowl directly into a skillet with 1 inch of water and bring the water to a simmer.
- Turn off the heat and add 3/4 of the chocolate, allowing the residual heat to melt it gradually while stirring occasionally.
- Remove the bowl from the water, dry the bottom thoroughly, and stir in the final 1/4 chocolate until it reaches a fluid consistency.
Notes
Nutrition
Frequently Asked Questions
How do I fix seized chocolate?
For a small seize, whisk in boiling water a tiny bit at a time until it smooths out, start with about 1 teaspoon per 3 oz and add only as needed. If you prefer, a tablespoon of warm liquid such as almond milk can also help loosen the emulsion, but add it gradually so you do not thin it too far.
Why shouldn’t I let the bowl touch the water in a double boiler?
When the bowl touches the simmering water, the chocolate gets hit with direct heat and can scorch before it melts evenly. Keeping it above the water lets steam provide gentler, more controlled warmth.
Is it better to melt chocolate chips or bars?
Bars and baking chocolate usually melt smoother because they are formulated to liquefy, while chocolate chips often contain stabilizers to hold their shape. Chips work, but they can stay thicker and less fluid for dipping.
What is the difference between melting and tempering?
Melting simply turns chocolate liquid, tempering manages cocoa butter crystallization so it sets shiny with a firm snap. The Reverse-Chip method is not full tempering, but it borrows the “seeding” idea for better-looking results.
How do I melt white chocolate without burning it?
Use lower heat, shorter bursts, and stir constantly, white chocolate scorches quickly and should stay under about 110°F. I also stop heating when it is mostly melted, then let residual heat finish the job.