Skip to content
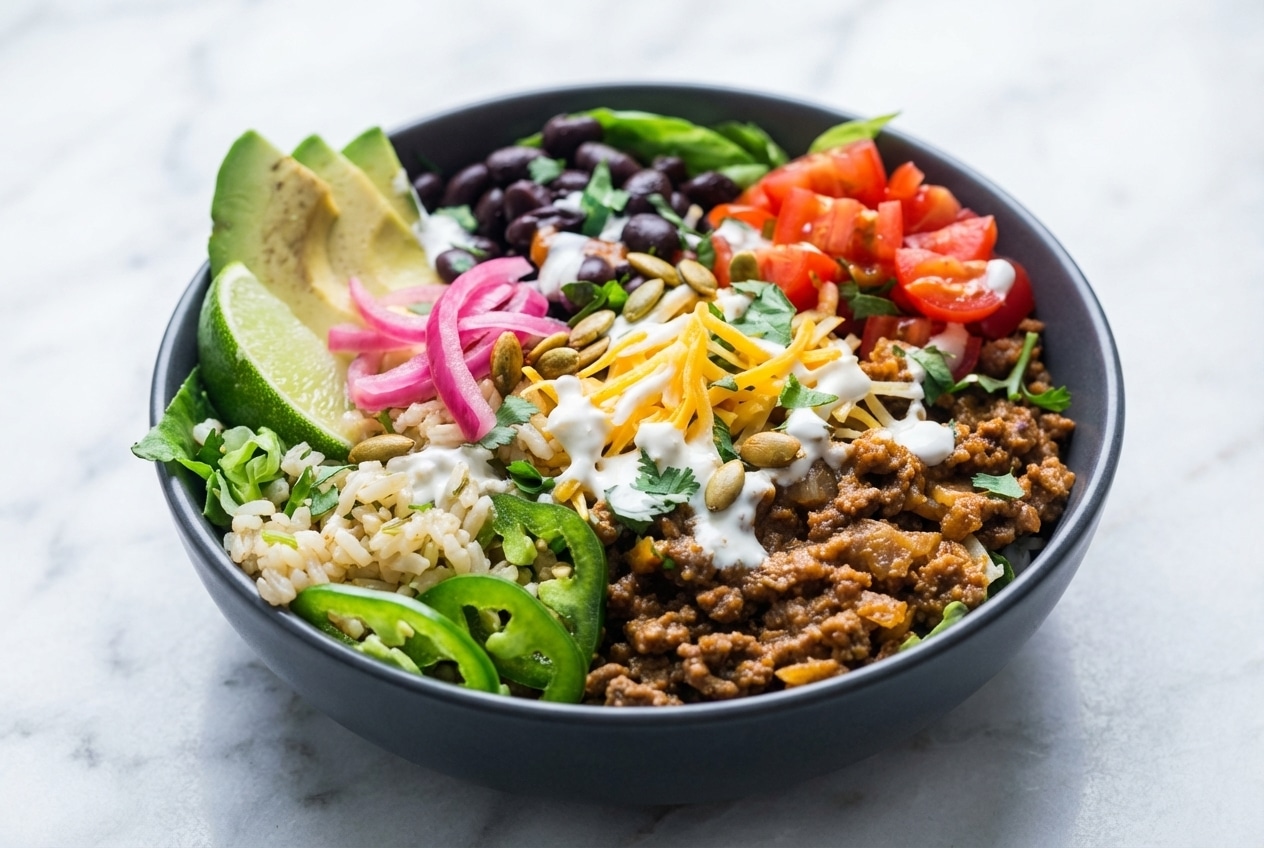
On busy American weeknights, I crave a dinner that lets everyone build their own perfect bite without turning my kitchen into a battlefield. That is where the taco bowl shines, it is the sweet spot between a fresh chopped salad and the cozy comfort of a burrito bowl.
Most versions are fine, but a little flat. In my Mexican-American home kitchen style, I borrow two small, restaurant-level moves that make a big difference, quick-pickled red onions for reliable zing and toasted pepitas for a crunch that does not quit.
Why You’ll Love This Recipe
Weeknight freedom: Everyone can customize their bowl, and dinner still hits the table fast, like a build-your-own burrito bowl night but lighter and brighter.
The secret twist: Quick-pickled red onions give a steady, clean acidic punch, so you are not gambling on a lime wedge that might be dry or weak.
Crunch that lasts: Toasted pepitas bring earthy, nutty snap that stays crisp longer than tortilla chips, even when it meets juicy taco meat and tomato sauce.
Balanced and flexible: With black beans, avocado, and your choice of ground beef or turkey, it is naturally gluten-free and easy to nudge toward ketogenic or low-carb.
Ingredients and Substitutions

This taco bowl is all about a savory base, crisp greens, and bright toppings. Keep the components separate until the last minute, and every bite stays fresh, crunchy, and bold.
Ingredients
Taco Meat:
- 1 tablespoon Olive Oil
- 1 small Onion, diced (about 1 cup)
- 1 pound Ground Turkey, or beef
- 2 tablespoons Taco Seasoning, or 1 packet
- ¼ cup Water
- ⅔ cup Tomato Sauce
- Salt and Pepper, to taste
Taco Bowl:
- 1 head Iceberg or Romaine Lettuce, chopped (about 8 cups)
- 2 cups Cilantro Lime Rice, or plain rice
- 1 (15 ounce can) Black Beans, rinsed and drained
- 1 cup Cherry Tomatoes, chopped
- 1 large Avocado, sliced
- 2 ounces Cheddar Cheese, shredded (about ½ cup)
- ½ cup Cilantro, chopped
- 2 Limes, cut into wedges
- 1 small Jalapeno, thinly sliced
- Sour Cream or Lime Crema, optional
- Hot Sauce, optional
Ingredient Notes & Substitutions
Ground Turkey, or beef: Turkey stays lean and clean tasting, while ground beef brings more richness. If you use a fattier beef, think 85/15, I always drain the excess so the bowl tastes bold, not greasy.
Taco Seasoning: Packages vary a lot in salt. I like starting lighter, then finishing with salt and pepper to taste once the sauce has thickened and coated the meat.
Cilantro Lime Rice, or plain rice: For low-carb or ketogenic, swap in cauliflower rice and keep the warm layer thin. For extra protein and a nutty bite, quinoa makes a great base that still feels “bowl-night” cozy.
Black Beans: If you are going very low-carb, skip them and lean on extra lettuce and avocado. If you keep them, warming the beans makes the bowl feel restaurant-style.
Sour Cream or Lime Crema, optional: Greek yogurt is my favorite lighter swap, it is tangy, high-protein, and still gives that cool, creamy contrast to taco seasoning heat.
How to Make taco bowl
Brown the taco meat for deep flavor
- Warm a skillet over medium heat, then add 1 tablespoon Olive Oil. Slide in the diced onion and sauté until it turns translucent and smells sweet, not sharp.
- Add the ground turkey or ground beef and break it up well. Let it sit in spots so it can brown, that little crust is the Maillard reaction doing its magic, then stir and continue until the meat is fully browned.
- If there is excess fat pooling, carefully drain it off so your taco bowl stays bright and not oily.
Simmer until saucy and clingy
- Sprinkle in the taco seasoning, then pour in the water and tomato sauce. Stir until everything looks evenly brick-red and glossy.
- Reduce heat and simmer about 5 minutes, stirring as needed, until the sauce thickens and coats the meat like a light glaze. Finish with salt and pepper to taste, then set aside until you are ready to build.
Quick-pickle and toast for the “zesty crunch” finish
- While the meat simmers, toss thinly sliced red onion with a splash of vinegar and a pinch of salt, then let it sit. By the time you serve, it should taste snappy, lightly tangy, and not harsh.
- In a dry pan, toast pepitas over medium heat until fragrant and slightly golden. The moment they smell nutty, pull them off so they do not turn bitter.
Build your bowls with the no-soggy layering trick
- Distribute the chopped lettuce into serving bowls, keeping it cold and crisp.
- Warm the taco meat, rice, and beans on the stove or in the microwave, then add them to the bowls in warm layers. This is where the magic happens, warm rice and beans go in first, then lettuce stays perky instead of wilting.
- Finish with toppings you love, cherry tomatoes, avocado, cilantro, lime wedges, jalapeño, cheddar cheese, sour cream or lime crema (optional), and hot sauce (optional). Add quick-pickled onions and toasted pepitas right at the end for that restaurant-style bite.
Secrets for the Perfect Texture and Flavor

The Thermal Barrier Strategy: I treat warm rice and warm black beans like a cozy buffer. When they sit against the bowl first, they protect the lettuce from steam, so your taco bowl eats crisp instead of soggy.
The Secret to Juicy Meat: If your meat looks dry or crumbly during simmering, it usually just needs a little more moisture. A small splash more tomato sauce, or even a spoon of water, brings back that glossy, saucy coating.
Acidity Balance: Quick-pickled red onions are the secret weapon because they cut through cheddar cheese and avocado richness. That sharp little pop keeps every forkful tasting fresh, even when the bowl is hearty.
Pro Tips & Troubleshooting
Pro Tips
- Drain excess fat before seasoning, especially with ground beef, so flavors stay clean and bold.
- Use Romaine or Iceberg for maximum crunch and structure, softer greens collapse too fast under warm toppings.
- Let the meat cool for a minute or two before assembling, it keeps lettuce crisp and avocado creamy.
- Charring corn tortillas in a dry skillet adds aroma if you serve them alongside.
Common Mistakes to Avoid
- Adding cold toppings while the meat is steaming hot, it wilts lettuce and turns avocado a little mushy.
- Over-seasoning early, some taco seasoning blends are salty, so start lighter and adjust at the end.
- Storing an assembled bowl for later, the textures collapse and the lettuce gets watery.
Serving & Storage

Creative Serving Ideas
A taco bar setup turns dinner into a choose-your-own-adventure, and it is the easiest way to please picky eaters. For a fun high-protein side, cottage cheese queso adds creamy dip energy without feeling heavy.
If you want the full Mexican-American comfort vibe, pair it with street corn style elote, sweet, smoky, and a little messy in the best way. I also love putting hot sauce, extra lime wedges, and toasted pepitas in little bowls so everyone can finish their bowl “their way.”
Storage & Meal Prep Mastery
The Separation Rule: Keep “wet” components separate from “dry” ones. Store meat, rice, and beans together, then keep lettuce, tomatoes, quick-pickled onions, and sauces in their own containers so nothing weeps into the greens.
Reheating Instructions: Reheat the taco meat and rice separately, using short microwave bursts and stirring between them so it warms evenly. Once hot, add a tiny splash of water to the meat if needed, it brings back that saucy sheen without overcooking.
Shelf Life: Taco meat keeps 3 to 4 days in the fridge in a sealed container. Assembled bowls are best avoided for long-term storage, but prepped components stay fresh when kept apart.

Zesty Taco Bowl With Quick-pickled Onions
Equipment
- Skillet
- Mixing bowl
- Small pan
Ingredients
Taco Meat
- 1 tablespoon Olive Oil
- 1 small Onion, diced (about 1 cup)
- 1 pound Ground Turkey, or beef
- 2 tablespoons Taco Seasoning, or 1 packet
- 0.25 cup Water
- 0.66 cup Tomato Sauce
- Salt and Pepper, to taste
Taco Bowl
- 1 head Iceberg or Romaine Lettuce, chopped (about 8 cups)
- 2 cups Cilantro Lime Rice, or plain rice
- 1 (15 ounce can) Black Beans, rinsed and drained
- 1 cup Cherry Tomatoes, chopped
- 1 large Avocado, sliced
- 2 ounces Cheddar Cheese, shredded (about 0.5 cup)
- 0.5 cup Cilantro, chopped
- 2 Limes, cut into wedges
- 1 small Jalapeno, thinly sliced
- Sour Cream or Lime Crema, optional
- Hot Sauce, optional
Instructions
Brown the taco meat for deep flavor
- Heat a skillet over medium heat and add olive oil. Sauté the diced onion until translucent and sweet.
- Add ground turkey or beef, breaking it up and letting it brown thoroughly to achieve a Maillard reaction crust.
- Carefully drain off any excess fat from the skillet to keep the flavor profile clean and light.
Simmer until saucy and clingy
- Sprinkle the taco seasoning over the meat, then stir in water and tomato sauce until evenly coated.
- Lower the heat and simmer for approximately 5 minutes until the sauce thickens and glazes the meat. Season with salt and pepper.
Quick-pickle and toast for the zesty crunch finish
- Thinly slice a red onion and toss with a splash of vinegar and salt. Let it sit while you finish the bowl components.
- Toast pepitas in a dry pan over medium heat until fragrant and golden, removing immediately to prevent bitterness.
Build your bowls with the no-soggy layering trick
- Place chopped lettuce into bowls. Add warm layers of rice, beans, and the taco meat first to protect the lettuce from wilting.
- Complete the bowls with tomatoes, avocado, cilantro, cheese, and jalapeño. Top with the quick-pickled onions and toasted pepitas before serving.
Notes
Nutrition
Final Thoughts
This taco bowl is the kind of dinner that feels bright and fresh, but still hits that savory comfort note. The quick-pickled onion and toasted pepita combo is my favorite way to make it taste like it came from a high-end Mexican-American kitchen.
Play with the base, play with the heat, and keep that layering trick in your back pocket for meal prep. When you want the same flavors in a fun handheld form, smash tacos bring that bold, crispy satisfaction.
Frequently Asked Questions
How do I meal prep taco bowls for the work week?
Pack components in separate sections or containers, warm items together (meat, rice, beans) and keep lettuce and toppings cold. Assemble right before eating, and add sauces last to prevent sogginess.
What are the best healthy substitutes for rice in a taco bowl?
Cauliflower rice is the go-to for low-carb, and chopped greens work when you want it extra light. Quinoa is great when you want a protein-rich, hearty base that still feels fresh.
How do I keep my avocado from browning in a pre-made bowl?
Slice it last, then press plastic wrap directly onto the surface to limit air contact. A squeeze of lime helps too, acidity slows browning and brightens the flavor.
What is the secret to making the meat juicy and not crumbly?
Brown it well first for flavor, then rely on tomato sauce plus a 5 minute simmer to keep it moist and cohesive. If it tightens up, a small splash of tomato sauce or water fixes it quickly.
Can I freeze the taco meat for later use?
Yes, freeze it in a sealed container for up to 3 months. Thaw overnight in the fridge, then reheat gently with a splash of water so it stays juicy.