Skip to content
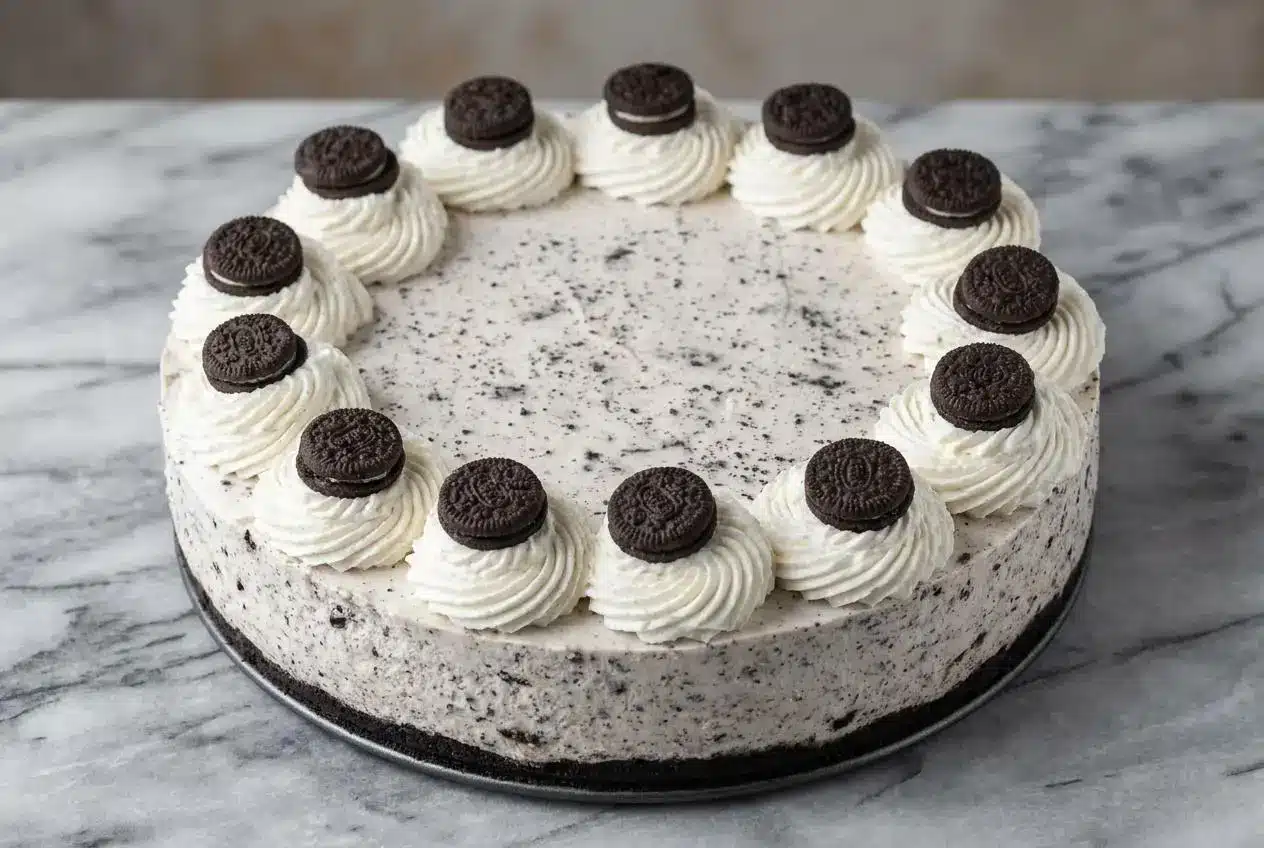
I still remember the first time I attempted a No Bake Oreo Cheesecake when I was hosting friends, and I learned the hard way that “no-bake” can sometimes mean “no-structure.” The slices slumped, the top looked pretty for about five minutes, and then it was all downhill.
This foolproof No Bake Oreo Cheesecake is my fix, and it’s the one I reach for when I want pure cookies and cream bliss without stress. It’s especially good for parties, holidays, and any night you want a make-ahead dessert that tastes like you worked for it.
Why You’ll Love This Recipe
Firm Slices, Every Time: In my kitchen, the secret I keep coming back to is adding 4 ounces (113g) of melted and slightly cooled white chocolate to the cream cheese mixture before folding in the whipped cream. As it chills, it re-solidifies and gives the filling extra structure, so you get that clean, sliceable set instead of a soft, soupy center.
Elevated Cookies and Cream Flavor: The white chocolate doesn’t just add sweetness, it brings a gentle vanilla and cocoa butter note that makes the “cream” in cookies and cream taste deeper and more luxurious. It’s a subtle upgrade, but once you taste it, you notice the difference.
Ultra-Creamy, Light, and Fluffy: My goal is always “firm but not heavy,” and this one lands there. Properly whipped cream and full-fat cream cheese create a filling that feels light and creamy while still holding its shape.
Simple and Make-Ahead Perfect: This is a true no-bake dessert, so you’re not babysitting a cheesecake in the oven. The chilling time does the work, and it’s ideal for getting ahead when you’re juggling a whole spread.
Ingredients and Substitutions

These ingredients are built for a stable Oreo crust and a creamy, sliceable filling, with our unique white chocolate twist doing heavy lifting during chilling time. Full-fat dairy and cold whipping cream are the difference between “wow slices” and “why is it runny?”
Ingredients
For the crust:
- 24 Oreos
- 4 tablespoons unsalted butter melted (60 grams)
For the no-bake cheesecake:
- 16 ounces brick-style cream cheese softened
- 1 cup powdered sugar (120 grams)
- 1 teaspoon vanilla extract
- 2 cups cold heavy whipping cream (480 ml)
- 16 Oreos chopped
Topping (optional):
- Homemade whipped cream
- 12 to 14 mini Oreos chopped (or 6 full-size Oreos, cut in half)
Ingredient Notes & Substitutions
Cream cheese: Use ONLY full-fat, brick-style cream cheese (like Philadelphia). Low-fat or tub-style cream cheese typically has more water and stabilizers, and that extra moisture is often the reason a no-bake cheesecake refuses to set properly.
Heavy whipping cream: Cold heavy whipping cream is crucial. When the cream is cold, it whips to stiff peaks more reliably, which creates the light, fluffy structure that keeps the filling from collapsing.
White chocolate: Choose a good quality white chocolate bar (like Ghirardelli or Lindt) rather than chips when you can. Bars melt more smoothly, and that smooth melt is what lets it blend into the cream cheese without streaks.
Oreos: Classic Oreos are the go-to for a classic cookies and cream vibe, but variations like Mint or Golden Oreos can be fun. For the crust, the whole Oreo goes in, cookie and cream filling included, because that combination is what delivers the signature Oreo crust.
How to make No Bake Oreo Cheesecake
Prep the Pan and Make the Oreo Crust
- First, line the bottom of a 9-inch springform pan with a circle of parchment paper. This helps the Oreo crust release cleanly after chilling, so you get sharp edges instead of a stuck base.
- Next, crush the Oreos into fine crumbs, then stir in the melted butter until the texture looks like evenly moistened sand. When you press it between your fingers, it should hold together without dry patches.
- Firmly press the buttery crumb mixture into the bottom of the prepared pan into an even layer. I like using the flat bottom of a measuring cup to compact it tight, then chill the crust in the refrigerator while you make the filling.
Create the Cream Cheese Filling
- Beat the softened brick-style cream cheese until completely smooth. Scrape the bowl as you go, because any little lumps here will stay visible in the finished cheesecake.
- Add the powdered sugar and vanilla extract, and beat until the mixture looks glossy and fully combined.
- Whip the cold heavy whipping cream in a separate bowl, starting on low speed and building up to medium-high until it thickens and stiff peaks form. Stiff peaks should hold their shape when you lift the beaters, with no drooping over.
- Stir in about one-third of the whipped cream to lighten the cream cheese mixture, then fold in the rest gently until just combined. Finally, fold in the chopped Oreos so they distribute through the filling without turning it grainy.
Assemble and Chill for a Clean Set
- Pull the crust from the refrigerator and spoon the cheesecake filling onto it. Spread it into an even layer so it chills uniformly for a better slice.
- If you want extra drama, pipe whipped cream around the edges and top with the Oreos. Cover the pan tightly and refrigerate for at least 4 to 5 hours, or overnight for the best, firmest texture.
- When it’s set, run a thin knife around the edge to release and slice. The first cut is always the proud moment, and it should look creamy and tidy, not loose.
The Secret to a Foolproof Slice
The White Chocolate Advantage
The white chocolate is the game-changing stabilizer. When it melts and then chills, the cocoa butter inside re-solidifies, helping firm up the filling and making it behave more like a cheesecake and less like a creamy mousse.
That extra structure is why this method is so reliable for that clean, sliceable outcome, even when you’re making it ahead and serving later.
The Importance of Grams
For the most consistent Oreo crust and filling, I strongly prefer weighing ingredients when possible. While cup measures can work, a kitchen scale takes guesswork out of things like powdered sugar and Oreo cookie quantity.
For reference, 24 Oreos is about 250g, which helps you nail the crust-to-butter ratio. When the crumb mix is evenly moistened, the base stays solid instead of turning soft.
Temperature is Everything
Room temperature cream cheese blends smoothly, which prevents lumps from forming in the filling. Cold heavy whipping cream whips with stable fat globules, which traps air efficiently and gives you stiff peaks that support a light yet firm cheesecake.
Those two temperatures are non-negotiable, because texture is all about timing and fat behavior, not luck.
The Science of a Perfect No-Bake Filling

Block vs. Tub Cream Cheese: A Crucial Choice
Brick-style cream cheese, like Philadelphia cream cheese, has a lower water content and a higher concentration of fat. In a no-bake Oreo Cheesecake, that fat and structure are what help the filling firm up when it chills, without becoming watery.
Tub-style cream cheese is often made with extra moisture and more stabilizers, which can be great for spreading, but in a no-bake cheesecake it can lead to a soft, runny set. You end up with something tasty, but not sliceable.
How to Achieve Stiff Peaks (And Why It Matters)
Stiff peaks are the visual cue that your whipped cream has built a stable foam network. Lift the beaters and you should see peaks that stand up and hold their shape, not peaks that slump over.
Scientifically, whipping forces air into the fat globules and creates structure. If you under-whip and the cream only reaches soft peaks, the cheesecake can collapse or stay too dense and loose because there is not enough stable network to hold volume.
Adapting Your Cheesecake for Different Pans
For an 8-Inch Round Pan
Using an 8-inch round pan will make your cheesecake taller, and it may need a bit more chilling time to fully set in the center. Keep the ingredient quantities the same, but build the crust slightly up the sides of the pan, about an inch, to help contain the thicker filling.
After chilling, the slices should come out clean, but give it extra time if the center feels even slightly soft.
For 9×9-Inch Cheesecake Bars
For bars, use the same ingredient quantities. Line the 9×9-inch pan with parchment paper, leaving an overhang on two sides so you can lift the slab out like handles.
Because the bars are thinner than a 9-inch round cheesecake, they typically set perfectly in the recommended chilling time. They are also fantastic for parties since they slice easily and serve cleanly.
Pro Tips & Troubleshooting
Pro Tips for Success
- Ensure cream cheese is FULL-FAT, brick-style, and FULLY softened to room temperature to prevent lumps.
- Use very cold heavy whipping cream and a cold bowl to ensure it whips up to stiff peaks.
- Line the bottom of the springform pan with parchment paper for easy removal.
- A teaspoon of fresh lemon juice in the filling can cut the richness and brighten the flavor.
- For the finest crust, use a food processor. If you don’t have one, a sealed bag and a rolling pin work great.
Common Mistakes to Avoid
- Using the Wrong Cream Cheese: Avoid tub-style or low-fat cream cheese at all costs. It will lead to a runny filling.
- Under-Whipping the Cream: Not whipping the heavy cream to stiff peaks is a primary cause of a cheesecake that won’t set.
- Lumpy Filling: This is almost always caused by using cream cheese that is too cold. Let it sit on the counter for at least an hour.
- Not Chilling Long Enough: A minimum of 4-5 hours is required, but overnight is truly best for a firm set.
Serving & Storage

For a classic look, garnish with beautiful piped whipped cream swirls and top each swirl with a mini Oreo or half of a regular Oreo. If you want a restaurant-style finish, drizzle the top with melted chocolate, white chocolate, or caramel sauce right before serving.
For a bright contrast to all that cookies and cream richness, serve with fresh strawberries or raspberries, or even a scoop of homemade lemon gelato for a tangy, refreshing pairing.
Make-Ahead: This cheesecake is an ideal make-ahead dessert. You can prepare it up to 2 days in advance. Keep it covered in the refrigerator, and garnish just before serving for the freshest look.
Refrigerator: Store leftover cheesecake tightly covered in the refrigerator for up to 4-5 days.
Freezing: This cheesecake freezes beautifully. Wrap the cheesecake (or slices) tightly in plastic wrap, then add a layer of aluminum foil. Freeze for up to 2 months, and thaw in the refrigerator overnight.

Foolproof No Bake Oreo Cheesecake

Equipment
- 9-inch springform pan
- Electric mixer
- Food processor (optional)
- Mixing bowls
- Parchment paper
Ingredients
For the crust:
- 24 Oreos
- 4 tablespoons unsalted butter, melted (60 grams)
For the no-bake cheesecake:
- 16 ounces brick-style cream cheese, softened
- 1 cup powdered sugar (120 grams)
- 1 teaspoon vanilla extract
- 2 cups cold heavy whipping cream (480 ml)
- 16 Oreos, chopped
Topping (optional):
- Homemade whipped cream
- 12 to 14 mini Oreos, chopped (or 6 full-size Oreos, cut in half)
Instructions
Prep the Pan and Make the Oreo Crust
- Line the bottom of a 9-inch springform pan with a circle of parchment paper for easy removal.
- In a food processor, crush the Oreos into fine crumbs. Alternatively, place them in a sealed bag and crush with a rolling pin. Stir in the melted butter until the mixture resembles damp sand.
- Press the crumb mixture firmly and evenly into the bottom of the prepared pan. Use the bottom of a flat measuring cup for a compact crust. Chill the crust in the refrigerator while you prepare the filling.
Create the Cream Cheese Filling
- In a large bowl, beat the softened cream cheese with an electric mixer until completely smooth and free of lumps. Scrape down the sides of the bowl as needed.
- Add the powdered sugar and vanilla extract. Beat again until the mixture is glossy and fully combined.
- In a separate, cold bowl, whip the cold heavy whipping cream until stiff peaks form. The peaks should hold their shape when the beaters are lifted.
- Gently fold about one-third of the whipped cream into the cream cheese mixture to lighten it. Then, fold in the remaining whipped cream until just combined, followed by the chopped Oreos.
Assemble and Chill for a Clean Set
- Spoon the cheesecake filling onto the chilled crust and spread it into a smooth, even layer.
- Cover the pan and refrigerate for at least 4-5 hours, or preferably overnight, to allow the cheesecake to set firmly.
- Before serving, run a thin knife around the edge of the pan to loosen the cheesecake. Garnish with optional whipped cream and extra Oreos if desired, then slice and serve.
Notes
Nutrition
Conclusion
This foolproof No Bake Oreo Cheesecake earns its name because the white chocolate twist helps the filling set firm, stay creamy, and slice cleanly. You get that iconic Oreo crunch with a texture that’s light, fluffy, and confidently sliceable.
If you end up loving cookies and cream, I’d also keep an eye out for other styles you can play with, like pandan basque cheesecake, for your next “one more bake” moment.
Frequently Asked Questions
Why is my no-bake cheesecake not firm and how can I fix it?
Can I use whipped topping (like Cool Whip) instead of making fresh whipped cream?
What is the best type of cream cheese to use for a no-bake cheesecake?
How do I properly store this Oreo cheesecake and can I make it ahead?
Can I freeze this no-bake cheesecake for later?
Can I make this recipe without a springform pan?