Skip to content
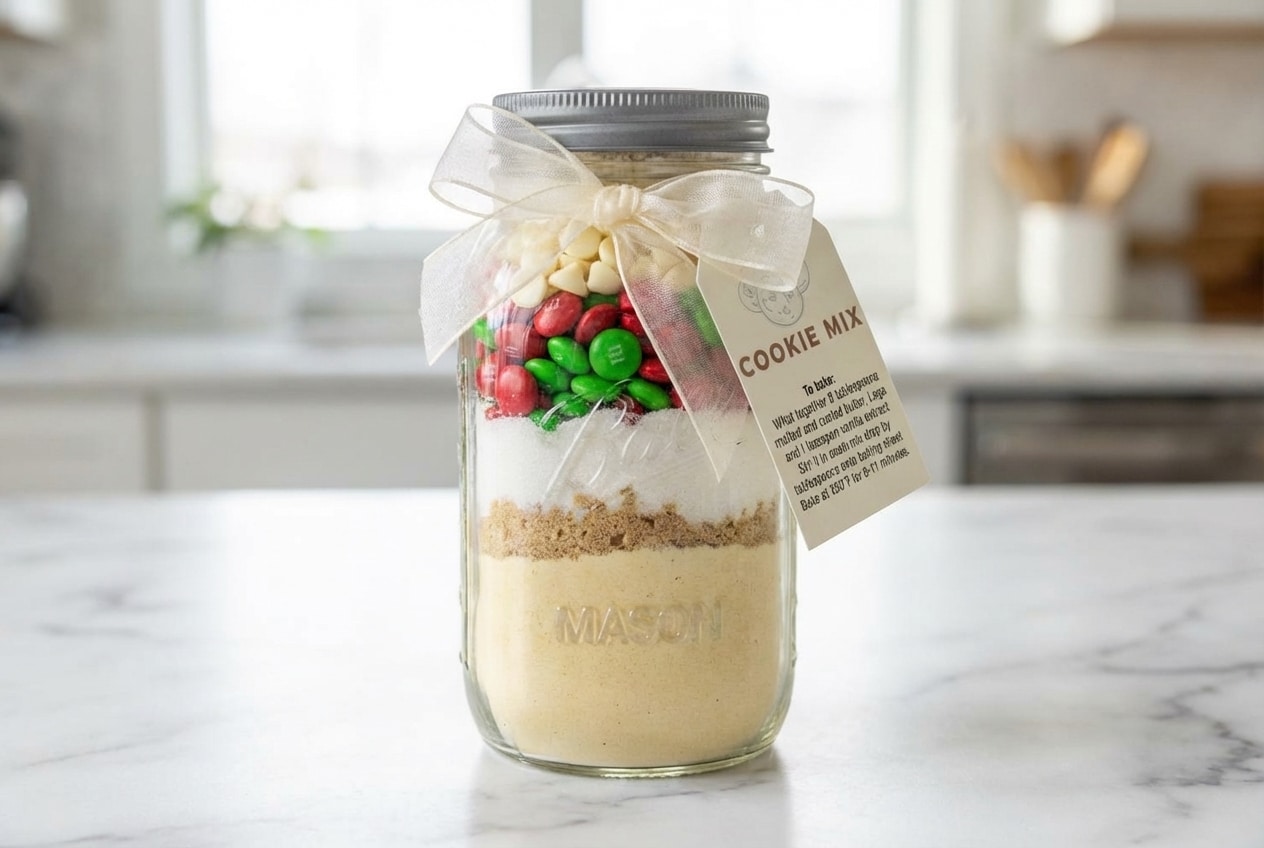
Every holiday season, my kitchen turns into a tiny gift workshop, ribbons on the counter, Mason Jars lined up like little lanterns. An edible gift feels personal, even when life is busy and you are juggling a dozen things at once.
This cookie mix in a jar is my go to when I want homemade charm without asking the recipient to do anything fussy. It also fixes the biggest problem with jar mixes, that “sweet but flat” flavor, with one bakery style trick that makes the cookies taste like you really know your way around a mixer.
Why You’ll Love This Recipe
Bakery flavor, zero extra work: I tuck 2 tablespoons of Toasted Milk Powder into the flour so the cookies come out with that deep, toasty, “why is this so good?” richness.
The Maillard magic shortcut: In my kitchen, toasted milk powder gives a brown butter vibe without browning anything, so the final bite tastes nutty and sophisticated with the same simple Baking Instructions.
Layers that travel well: When you build it in a wide mouth Quart Jar, the Layering stays crisp and pretty, even after a bumpy car ride to a teacher or neighbor.
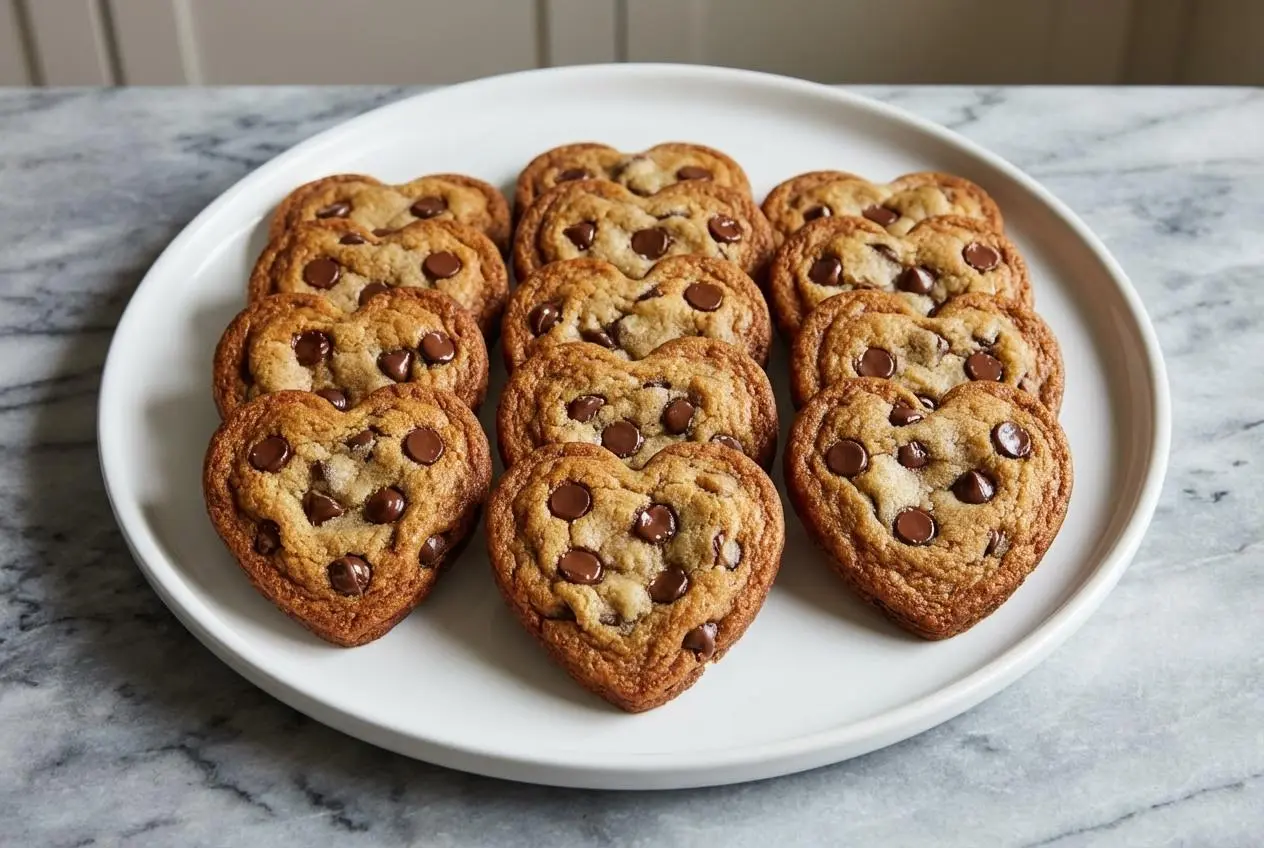
Chewy, gourmet style results: The balance of Brown Sugar and mix ins bakes up soft centered cookies with golden edges, the kind people reach for before the pie.
Ingredients and Substitutions

Think of this as a dependable base, flour for structure, sugars for chew, and mix ins for personality. The jar does the gifting, and the recipient only adds the wet ingredients to bake.
Ingredients
For the mix:
- 1 1/2 cups all-purpose flour
- 1 teaspoon baking powder
- 1/2 teaspoon baking soda
- 1/2 teaspoon fine sea salt
- 1/3 cup brown sugar
- 1/2 cup granulated sugar
- 1 to 1 1/2 cups chocolate chips, chocolate candies, dried fruit, nuts, etc.
To bake the cookies:
- 8 tablespoons unsalted butter
- 1 large egg
- 1 teaspoon pure vanilla extract
Ingredient Notes & Substitutions
Chocolate chips vs. chocolate candies: Chocolate chips melt into pockets and give that classic bakery look, while candy coated pieces pop beautifully through the glass for Holiday Gifting, especially if you want bold color in the layer on top.
All-purpose flour: A 1:1 gluten-free flour blend can be swapped in when you are building the jar, and it keeps the “dump, mix, bake” ease the same for the recipient.
Mix-ins: If you are gifting to someone sensitive, I start with certified allergen-free ingredients, then I keep nuts out of the jar and let the recipient add their own if they like.
Toasted milk powder: This is the quiet upgrade, it adds a warm, toasty dairy note that reads like brown butter. I whisk it thoroughly into the dry base so no little pockets end up hiding in the flour.
How to Make cookie mix in a jar
Build the dry base
- In a medium bowl, whisk the flour, baking powder, baking soda, and salt until the mixture looks uniform and airy, with no streaks of leavener hiding anywhere.
- Pour that flour blend into a clean 1-quart Mason Jar, then tap the jar firmly on the counter until the surface settles flat and level, you want a tight foundation so the layers stay sharp.
Layer for clean lines and easy mixing later
- Add the brown sugar next, nudging it around the inside edge first so the glass shows a clear band, then smooth the top with the back of a spoon.
- Scatter in the granulated sugar and level it again, keeping the top as even as you can so the next layer sits neatly.
- Finish with your mix-ins, placing darker pieces first and lighter ones on top if you are combining options, the contrast looks gorgeous through the jar.
- Seal with the lid, then dress it up with ribbon and a tag, and make sure the baking directions are easy to read for the recipient.
Baking instructions for the gift tag
- Heat the oven to 350°F, then line 2 baking sheets with parchment so the cookies lift cleanly and bake evenly.
- Melt the butter in a microwave-safe bowl, then let it cool briefly so it feels warm, not piping hot, this keeps the egg from scrambling when it hits the bowl.
- Whisk in the egg and vanilla until glossy and smooth, like a loose custard base.
- Pour in the entire jar of dry mix and stir until you cannot see dry floury patches, the dough should look thick and studded, and you will smell that warm, toasty aroma as the dry mix meets the butter.
- Scoop onto the sheets with space to spread, then bake for 9-12 minutes, pulling them when the edges are browned and the centers still look a touch soft.
Mastering the Art of the Perfect Jar

Shelf life intelligence: In a cool, dry pantry, a standard jar keeps its best quality for 6 months. If you include nuts, I keep it to about 3 months, because the natural oils can turn stale faster than you think.
Jar sizing guidance: A 1-quart (32 oz) jar is the sweet spot for this batch, especially if you pack each layer firmly. If you only have pint jars, halve the recipe exactly, or you will fight the lid at the end.
High-altitude adjustments: For friends baking up in the mountains, I note on the tag to slightly increase flour or decrease sugar. That small tweak helps cookies hold shape and avoids overspreading at elevation.
Pro Tips & Troubleshooting
Pro Tips
- A parchment paper funnel keeps the glass walls clean and gift-ready.
- Pack each layer firmly with a spoon so lines stay distinct.
- Start with the flour mixture on the bottom so sugars do not sift down.
- Break up brown sugar clumps before layering for an even, tidy band.
- Only fill a completely dry jar, even slight dampness causes clumping.
Common Mistakes to Avoid
- Choosing a jar that is too small, a 1-quart jar is the standard.
- Leaving the brown sugar loose, it collapses and muddies the layers.
- Letting flour dust coat the upper glass, it makes the gift look messy.
- Overmixing after adding the jar, stop once no dry bits remain.
- Dry dough at bake time, add 1 tablespoon of milk or an extra tablespoon of butter if it feels crumbly.
Serving and Gifting Ideas

Presentation and Decor
A ribbon and a simple tag go a long way, and I love tying on a tiny cookie cutter or a festive wooden spoon so the jar feels like a complete little moment. Clear Printable Tags with the oven temperature, wet ingredients, and 9-12 minute bake time save the recipient from guessing.
A themed gift basket feels extra thoughtful with homemade hot honey tucked beside the jar. That sweet heat pairs beautifully with chocolate, especially after a big holiday meal.
Gift Set Pairings
A sturdy cookie sheet, a silicone spatula, or a cheerful kitchen towel turns this into a host gift that looks curated, not last minute. If you bake the cookies yourself, crumbling them into a strawberry brownie trifle adds a buttery, chewy layer that tastes like a bakery dessert cup.
The Perfect Homemade Gift Solution
This cookie mix in a jar is my standby for teachers, neighbors, and hostesses because it looks charming, travels well, and bakes up like a treat from a good bakery case. The toasted milk powder twist is the difference between “cute idea” and “please send me the recipe,” and that is exactly what you want from a homemade gift.
Once you have the base down, it is easy to play with mix-ins for the season, think dried cranberries, white chocolate, or a handful of oats for a cowboy vibe. Keep the layers tidy, keep the jar dry, and you will gift with confidence.

Gourmet Cookie Mix In A Jar
Equipment
- 1-quart Mason Jar
- Baking sheets
- Parchment paper
Ingredients
For the mix:
- 1.5 cups all-purpose flour
- 1 teaspoon baking powder
- 0.5 teaspoon baking soda
- 0.5 teaspoon fine sea salt
- 0.33 cup brown sugar
- 0.5 cup granulated sugar
- 1 to 1.5 cups chocolate chips, chocolate candies, dried fruit, nuts, etc.
To bake the cookies:
- 8 tablespoons unsalted butter
- 1 large egg
- 1 teaspoon pure vanilla extract
Instructions
Build the dry base
- In a medium bowl, whisk the flour, baking powder, baking soda, and salt until the mixture looks uniform and airy, with no streaks of leavener hiding anywhere.
- Pour that flour blend into a clean 1-quart Mason Jar, then tap the jar firmly on the counter until the surface settles flat and level to create a tight foundation.
Layer for clean lines and easy mixing later
- Add the brown sugar next, nudging it around the inside edge first so the glass shows a clear band, then smooth the top with the back of a spoon.
- Scatter in the granulated sugar and level it again, keeping the top as even as you can so the next layer sits neatly.
- Finish with your mix-ins, placing darker pieces first and lighter ones on top for contrast, then seal with the lid and decorate with ribbon.
Baking instructions for the gift tag
- Heat the oven to 350°F and line 2 baking sheets with parchment paper.
- Melt the butter in a microwave-safe bowl and let it cool briefly so it is warm but not hot.
- Whisk in the egg and vanilla until the mixture is glossy and smooth.
- Pour in the entire jar of dry mix and stir until no dry floury patches remain.
- Scoop the dough onto the sheets and bake for 9-12 minutes, pulling them when the edges are browned and the centers remain slightly soft.
Notes
Nutrition
Frequently Asked Questions
What size jar do I need for a cookie mix?
Most standard cookie mix recipes require a 1-quart (32-ounce) mason jar. Wide-mouth jars are highly recommended because they are easier to fill, pack, and later empty into a mixing bowl.
How long can I store the cookie mix jar before gifting?
If you start with fresh flour and sugar, the jar keeps well for up to 6 months in a cool, dry pantry. If you include nuts, plan on about 3 months since the oils can go rancid sooner.
How do I get those perfect, clean layers?
Packing is the secret, press each layer firmly with a flat-bottomed tool, and level it before adding the next. A simple funnel also prevents flour from dusting the inside of the glass.
What should I write on the gift tag?
Include the wet ingredients, 8 tablespoons unsalted butter, 1 large egg, and 1 teaspoon pure vanilla extract, plus the oven temperature of 350°F and the bake time of 9-12 minutes. It is also thoughtful to list the dry ingredients for allergy awareness.
Can I make this vegan-friendly for the recipient?
You can note on the tag that a plant-based butter and an egg substitute may work, then the recipient can choose their preferred options. When allergies are a concern, I keep mix-ins simple and clearly labeled.
Any other DIY food gifts that feel impressive?
Something cold and trendy can round out a dessert table, and mochi ice cream is a fun option when you want variety beyond cookies. It also makes a playful pairing if you are serving warm cookies for contrast.