Skip to content
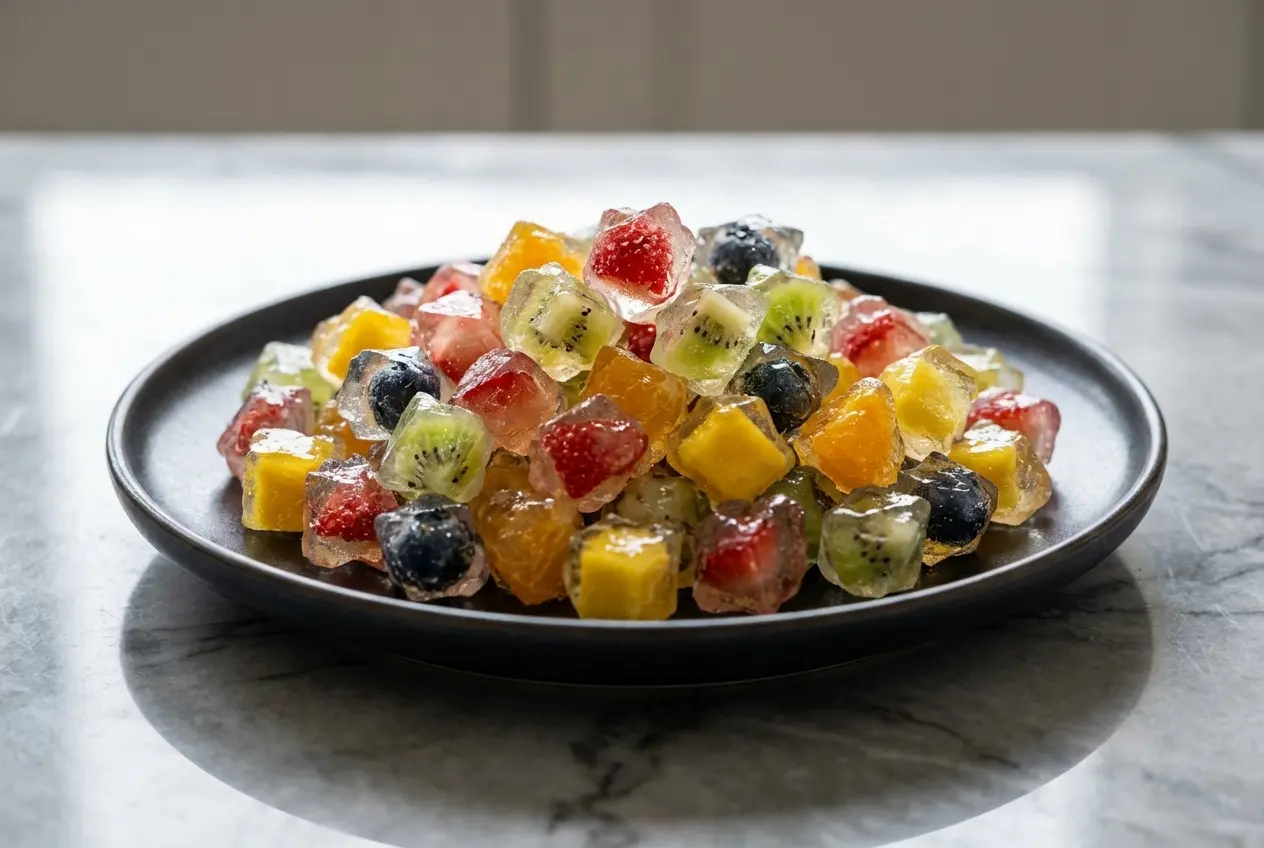
The first time I made japanese jelly candy in my kitchen, I understood why these little sweets stop people in their tracks. They catch the light like tiny gemstones, and when done right, they deliver that lovely contrast between a delicate jelly center and a crisp, sugary finish.
This version is perfect for anyone who loves beautiful homemade treats, vegan candy, or classic Wagashi with a playful twist. If you enjoy desserts that feel a little magical but are surprisingly simple to make, this one is worth clearing a spot for on the counter.
Why You Will Love This Recipe
Jewelry Box Looks: These candies have that translucent, jewel-like beauty that makes Kohakuto and other Japanese confectionery so memorable. I love setting them out on a dark plate and watching everyone lean in for a closer look.
The Diamond Crust: What makes this version special is the crystallization finish. In my kitchen, letting the cut pieces dry slowly creates that brittle, glassy shell that cracks gently before you reach the soft agar center.
Completely Plant-Based: Because this recipe relies on Agar-agar, also called Kanten, instead of gelatin, it fits beautifully into a vegan dessert spread. The texture is cleaner and more elegant than a standard gummy candy.
A Real Sensory Treat: You get color, shine, crunch, and a cool, silky bite all at once. It reminds me of the same crunchy-meets-soft pleasure people love in layered desserts like orange pretzel parfait, just in a much more delicate, jewel-toned form.
Ingredients and Substitutions

These few ingredients do a lot of work, creating a clear jelly base, gentle sweetness, and colorful fruit pieces that make every candy look a little different.
Ingredients
- 1-liter water
- 100 grams caster sugar
- 8g Agar-agar powder
- Fresh fruit: strawberries, kiwi, berries, mango, mandarin oranges
Ingredient Notes & Substitutions
Agar-agar powder: Powder is the easiest and most dependable form to use for japanese jelly candy. Kanten and Agar-agar are often treated as the same thing in home cooking, but different brands can vary in strength, so I always start with 8g of powder for this water amount and avoid guessing with flakes or strips unless I already know the brand well.
Caster sugar: Caster sugar dissolves quickly and gives the jelly a cleaner finish, which helps when you want that polished crystal candy look. Granulated sugar works too, but I find it needs a bit more attention while whisking so no grains linger in the pan.
Fresh fruit: Bright fruit gives the prettiest mosaic effect, especially strawberries, mango, mandarin segments, and berries. Kiwi can be gorgeous here too, but very acidic or enzyme-heavy fruit sometimes needs careful handling if your jelly seems reluctant to set.
Sugar-free swaps: If you are wondering about erythritol or monk fruit, I do not recommend them for the Kohakuto-style crust. The signature crystallization depends on real sugar behaving the way sugar should, so substitutes may set the jelly differently and usually will not give that classic crunchy shell.
Flavor variations: Some of my favorite batches use a little matcha, hojicha, or fruit tea in place of part of the water for a more grown-up flavor. The base is simple, so even a small infusion changes the personality of the finished candy.
How to Make japanese jelly candy
Prepare the Fruit Canvas
Cut the strawberries, kiwi, berries, mango, and mandarin oranges into small, bite-sized pieces. I like mixing neat geometric cuts with a few natural shapes so the finished candies look like little stained-glass gems rather than uniform cubes.
Make the Agar Base
- Pour the water into a medium saucepan, then add the caster sugar and Agar-agar powder. Whisk over medium heat until everything is fully dissolved and the mixture looks clear rather than cloudy or grainy.
- Bring the liquid to a full boil and keep it there for 1 to 2 minutes so the agar fully activates. This step matters more than people think, because if the mixture never truly boils, the jelly can stay loose instead of setting with that clean, firm snap.
- Take the pan off the heat and let the liquid stand until it feels warm to the touch, but has not started to set. That little cooling window keeps the fruit bright and fresh-looking instead of softening it with too much heat.
Assemble and Chill
- Pour the warm jelly base into your mold, then gently press the fruit pieces into place. If you want the fruit suspended rather than sitting at the bottom, wait until the liquid has cooled slightly and thickened just a touch before arranging the pieces.
- Let the mold cool, then refrigerate until fully chilled and firm, about 2 hours. If you are using an ice cube tray, slide a sharp knife carefully along the inside edge of each cavity to help release the jellies without tearing them.
Create the Diamond Crust
For a Kohakuto-style finish, unmold the firm jelly and cut it into jagged, crystal-like pieces. Lay them on parchment in a cool, dry spot for 2 to 4 days, turning them now and then, until the outside develops a delicate crystallization that feels dry and lightly crunchy while the center stays soft and yielding.
Secrets for Perfection
The boiling rule matters: Agar-agar is not like gelatin, and it needs a proper boil to wake up its gelling power. If the liquid only gets hot, you may end up with a pan of sweet fruit water instead of clean-cut jelly.
Low humidity is your friend: The Diamond Crust forms through surface crystallization, so a cool, dry room makes a huge difference. On a humid day, the candy can stay tacky and glossy much longer, even when the interior has already set perfectly.
Ratios keep the texture honest: When scaling for Kohakuto, the sugar-to-water balance needs to stay consistent so the outer crust forms properly. Once that balance drifts too far, the candy may turn soft, sticky, or simply refuse to develop that signature shatter.
Watch for syneresis: If your jelly starts weeping, it usually means the agar was not fully dissolved or the proportions were off. In my kitchen, a smooth fully boiled base is the easiest insurance against water leaking out later.
Understanding Agar-Agar vs. Gelatin
Agar-agar, or Kanten, gives japanese jelly candy its characteristic clean bite. Instead of the bouncy, stretchy feel you get from animal-based gelatin, agar sets into a firmer texture with a neat snap that feels especially refreshing with fruit.
It is also an algae-based gelatin substitute, which is one reason it has long been a staple in vegan candy and traditional Wagashi. If plant-based desserts are your thing, a bright frozen option like strawberry dole whip fits into the same easygoing, fruit-forward mood.
Another reason I love working with agar is its temperature stability. It sets at room temperature more readily than gelatin and does not slump as quickly on a warm dessert table, which makes it a smart choice for summer gatherings and tea parties.
The History of Kohakuto Crystal Candy

Kohakuto, often called amber sugar, sits within the wider world of Wagashi, the refined sweets served with tea and tied closely to seasonality, color, and presentation. The broader historical evolution of Japanese confectionery helps explain why these sweets feel so artful, with sugar and design both playing a larger role over time.
What makes Kohakuto especially charming is its reputation as edible jewelry. Once you see the crystalline shell and glowing center side by side, it is easy to understand how this traditional sweet became a social media favorite far beyond Japan.
Pro Tips & Troubleshooting
Pro Tips
- Silicone ice cube trays make unmolding much easier and help protect the delicate edges of the jelly.
- For a more dramatic crystal candy look, use fruits in contrasting colors so each piece has a stained-glass effect.
- A drop of natural food coloring or a spoonful of fruit juice can give the base a soft ombre look without overpowering the flavor.
- Replacing part of the water with matcha or hojicha gives the candy a more sophisticated, earthy profile that pairs beautifully with tea.
- If you want pineapple in the mix, careful cutting pineapple into neat pieces helps with presentation, but I still prefer to blanch highly acidic fruit briefly if setting has been an issue in past batches.
Common Mistakes to Avoid
- Skipping the full boil is the quickest way to end up with jelly that never properly sets.
- Adding fruit while the liquid is still very hot can dull the color and make the fruit taste cooked instead of fresh.
- Using very wet or thawed fruit without draining it well can dilute the base and affect the final texture.
- Trying to speed up the Diamond Crust with an oven or hairdryer usually gives uneven results. Patience is what creates the best crystallization.
- If the jelly turns out too firm, the agar may be a strong brand or slightly overmeasured. If it stays loose, the agar likely did not boil long enough or did not dissolve completely.
Serving & Storage

Serving Ideas
These candies feel right at home beside hot matcha or green tea, where the slight bitterness balances the sweetness beautifully. I also love dropping a few into sparkling water or cider, where they look like floating jewels in the glass.
For parties, arrange them on a dark ceramic plate so the translucent colors stand out. If you enjoy playful fruit presentations, the same bright, crowd-pleasing spirit shows up in dessert kabobs, especially when you want a table full of color.
Storage & Make-Ahead
If you are serving them as soft jellies without the crystallized finish, keep them in the refrigerator and enjoy them within up to 3 days. They taste best cold, with the fruit still fresh and the texture clean.
Once the Kohakuto crust has formed, move the candies to an airtight container and keep them at room temperature for up to 2 weeks. Do not refrigerate them at that stage, because fridge humidity softens the crisp shell you waited days to build.

Crystal Japanese Jelly Candy (kohakuto)
Equipment
- Medium saucepan
- whisk
- Candy mold or silicone tray
- Parchment paper
Ingredients
- 1 liter water
- 100 grams caster sugar
- 8 g Agar-agar powder
- Fresh fruit: strawberries, kiwi, berries, mango, mandarin oranges
Instructions
Prepare the Fruit Canvas
- Cut the strawberries, kiwi, berries, mango, and mandarin oranges into small, bite-sized pieces. Use a mix of geometric and natural cuts for a stained-glass effect.
Make the Agar Base
- Pour the water into a medium saucepan, then add the caster sugar and Agar-agar powder. Whisk over medium heat until everything is fully dissolved and clear.
- Bring the liquid to a full boil and maintain for 1 to 2 minutes to ensure the agar is fully activated.
- Remove from heat and let the mixture stand until warm to the touch but not yet setting.
Assemble and Chill
- Pour the warm jelly base into your mold. Gently press the fruit pieces into the liquid, waiting until it thickens slightly if you want them suspended.
- Allow the mold to cool, then refrigerate for about 2 hours until the jelly is firm and fully chilled.
Create the Diamond Crust
- Unmold the firm jelly and cut it into jagged, crystal-like pieces. Place them on parchment paper in a cool, dry spot.
- Let the pieces dry for 2 to 4 days, turning them occasionally, until a delicate, crunchy sugar crust forms on the outside.
Notes
Nutrition
Conclusion
This recipe turns a handful of simple ingredients into japanese jelly candy that looks like it came from a little confectionery case. The best part is still that Diamond Crust moment, when the outside gives a delicate shatter and the center stays soft and silky.
Once you make one batch, it is hard not to start dreaming up new fruit combinations and colors. A few small changes in shape, tea infusion, or fruit choice can make every tray feel like a fresh collection of edible gems.