Skip to content
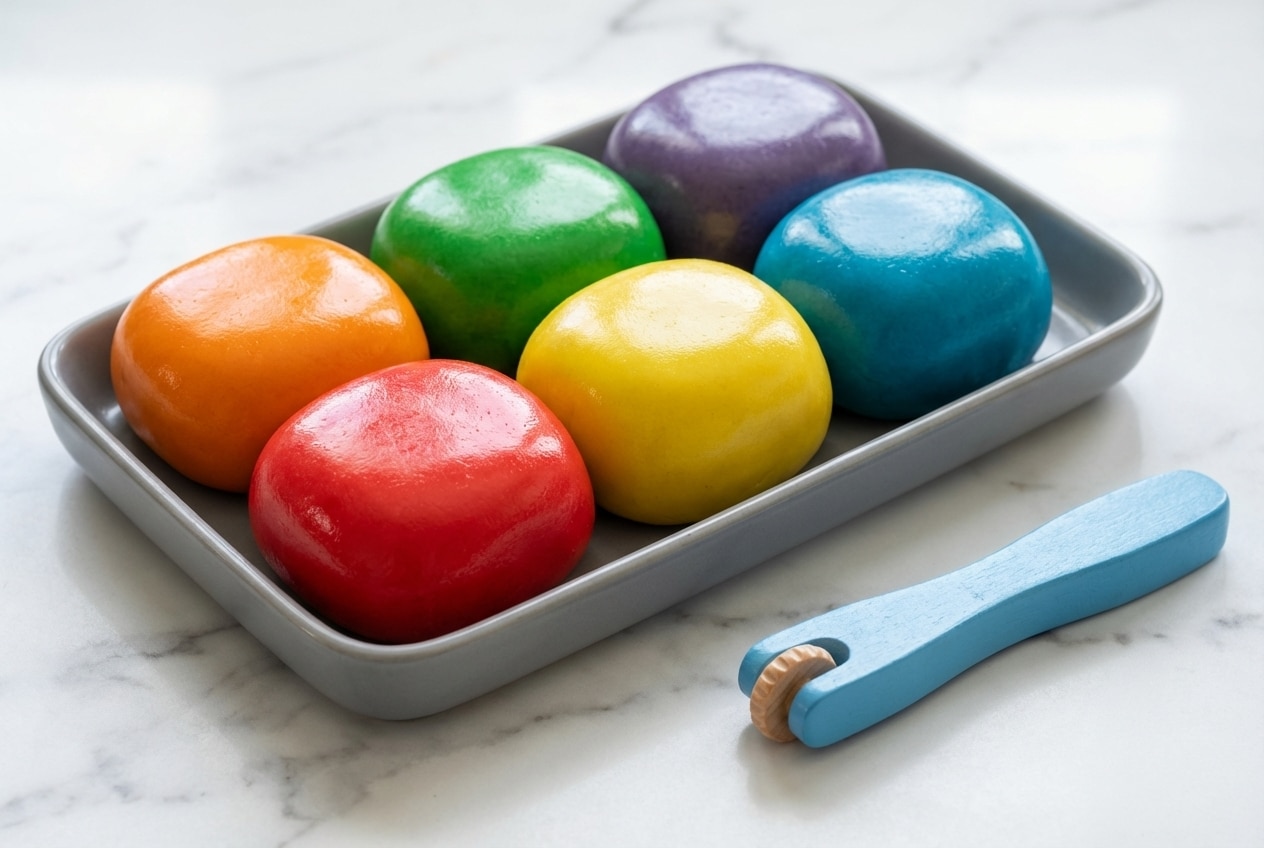
There is something wildly comforting about that familiar, clean-salty scent of warm play dough, the kind that takes you straight back to kindergarten tables and rainy-day crafts. In my kitchen, this play dough recipe has become a little ritual when the day needs slowing down, whether you are parenting, teaching, or just craving a calm sensory moment.
I am going to show you the stovetop method I rely on for a silky, non-greasy feel and long-lasting softness, with one small “pro” addition that makes it look like the good store-bought stuff.
Why You Will Love This Recipe
The Bakery Shine Secret: A tiny bit of vegetable glycerin (a humectant) gives the dough that subtle glossy “bakery-style” finish, and it helps stop that frustrating salty crust from forming later.
Unmatched Durability: This formula holds moisture beautifully, so the dough stays soft and pliable for months instead of drying out after a week.
Perfect Consistency: You get a smooth, squishy, elastic dough that feels great in little hands, and it is ideal for sensory play and fine motor skills practice.
Cost-Effective Comfort: With All-purpose flour and Sodium chloride doing the heavy lifting, you get a premium texture for pantry-staples pricing.
Ingredients and Substitutions

These are simple pantry basics, but the balance matters. When flour, salt, and water hit gentle heat together, you get that classic play dough bounce that feels “just right.”
Ingredients
- 1 cup all-purpose flour
- 1 cup water
- 2 teaspoons cream of tartar
- 1/3 cup salt
- 1 tablespoon vegetable oil
- food coloring
Ingredient Notes & Substitutions
Cream of tartar (potassium bitartrate): This is the quiet hero for texture. It helps with stability so your dough stays stretchy instead of turning into a crumbly mess; lemon juice or vinegar can work in a pinch, but the feel and shelf life can vary.
Vegetable glycerin: My “bakery shine” trick is adding 1 teaspoon to the wet ingredients, even though it is not in the base list above. Because it is a humectant, it helps the dough hold onto moisture and stay smoother longer.
Vegetable oil: Coconut oil can be swapped in if you want a soft, lightly sweet scent, and I find it can make the dough feel extra plush once kneaded.
Food coloring: Gel food coloring gives bold color without thinning the dough. If you only have liquid coloring, use a light hand so the mixture does not get too wet.
How to Make play dough recipe
Cold Mix in the Saucepan
- Set a 2-quart saucepan on the counter and add everything in while the pan is still cold. I like to stir the food coloring into the water first so the color looks even, then add the flour, salt, cream of tartar, and oil.
- Stir until you have a smooth, milky slurry with no dry pockets of flour. It will look loose and a little cloudy, that is exactly right before heat tightens it up.
Cook Gently and Stir Constantly
- Turn the burner to low/medium heat and keep stirring, scraping the bottom and corners as you go. In a minute or two it will smell lightly “bready,” and the mixture will start to turn from runny to creamy.
- Keep stirring as it thickens, because this is where starch gelatinization happens and the dough forms. You will see soft clumps appear, then those clumps quickly unite into one mass.
Know When It’s Done
It is ready when the dough gathers around your spoon and the pan looks mostly clean, and when you touch a little bit, it does not cling to your fingers. If it still feels sticky, it simply needs a bit more time on that same low/medium heat while you keep stirring.
Cool and Knead for a Silky Finish
Scrape the dough onto wax paper or a plate to cool, then once it is comfortable to handle, knead it vigorously for 2 minutes. This last step is where it turns from “homemade” to that smooth, springy, professional texture.
The Science of Play Dough Perfection

Temperature control: Low/medium heat is not just a suggestion, it is the difference between silky and rubbery. Gentle heat lets flour starches hydrate and swell gradually, and the mixture transforms cleanly from slurry to dough without scorching.
The sentence “starch gelatinization process explains why gentle heat matters.” In practice, you are watching for that moment when the paste stops looking glossy-wet and starts pulling away from the pan like one cohesive ball.
The role of salt (sodium chloride): Salt works as a preservative to slow mold, and it also helps reduce stickiness so the dough releases from hands and surfaces more easily. That is why “just a pinch” never behaves the same way, especially after a few days in storage.
Why cream of tartar helps: Potassium bitartrate acts like a stabilizer, supporting elasticity and keeping the texture pleasant over time. It is also why this recipe tends to stay smoother than many quick no-cook versions.
Humidity adjustments: In humid weather, dough can feel a little “sweaty” on the outside. I knead in about a tablespoon of extra all-purpose flour until the surface feels dry-satin again, not tacky.
When I explain this cooking change, I compare it to mochi dough texture for the same reason. Both rely on controlled heat and steady stirring to build that stretchy, cohesive feel.
Pro Tips & Troubleshooting
Pro Tips
- Use non-stick cookware so a crust does not glue itself to the bottom, and cleanup stays quick.
- Stir the food coloring into the water first for even color and less hand-staining.
- For “Galaxy Dough,” use dark purple gel coloring plus fine glitter for a starry look.
- For aromatherapy play, add a couple drops of lavender or peppermint essential oil after cooking, then knead it in.
- Knead for 2 full minutes once cooled, that is the shortcut to silky-smooth.
Common Mistakes to Avoid
- Storing the dough while warm, the trapped condensation can turn into musty mold fast.
- Cooking on high heat, it can scorch the flour and make the dough rubbery.
- Discarding sticky dough, it is usually under-cooked and needs more stovetop time.
- Using too much liquid food coloring, it can thin the dough and keep it tacky.
That little glycerin upgrade is one of my favorite clever kitchen hacks for DIY projects. Small changes like that are what make homemade versions feel polished, not “close enough.”
Serving and Storage for Longevity
Creative Play Ideas
For calm, focused play, I set out rolling pins, alphabet cutters, and “loose parts” like shells or smooth rocks. University educators often highlight fine motor skill development as a key benefit, and you can really see it when kids pinch, roll, and snip with scissors.
For party favors, this dough looks gorgeous packed into clear mason jars, especially with layered colors. A ribbon and a little name tag makes it feel like a boutique gift without boutique prices.
Storage and Shelf Life
Store in an airtight container or a Ziploc bag with the air squeezed out. Keep it in a cool, dry place, and thanks to the glycerin helping hold moisture, it can stay soft up to 6 months when stored well.
If you notice any odd smell, visible mold, or a slimy feel, toss it and make a fresh batch. The salt helps preservation, but warm storage and damp hands can still shorten shelf life.
Cleaning Guide for Household Surfaces
Fabric and upholstery: Let playdough dry completely first, because wet dough smears deeper into fibers. Once it is dry and crumbly, use a stiff brush to break it up, then vacuum thoroughly.
Stains: Blot with mild soap and cold water, working from the outside in. Hot water can set the floury residue, so keep it cool and gentle, especially on carpet and couches.

Silky Homemade Play Dough Recipe
Equipment
- 2-quart saucepan
- Stiff spoon or spatula
- Wax paper or plate
Ingredients
- 1 cup all-purpose flour
- 1 cup water
- 2 teaspoons cream of tartar
- 1/3 cup salt
- 1 tablespoon vegetable oil
- food coloring
Instructions
Cold Mix in the Saucepan
- Set a 2-quart saucepan on the counter and add all ingredients while the pan is still cold. Stir the food coloring into the water first for even distribution, then add the flour, salt, cream of tartar, and oil.
- Stir the mixture until you have a smooth, milky slurry with no dry pockets of flour. It should look loose and a little cloudy before any heat is applied.
Cook Gently and Stir Constantly
- Turn the burner to low or medium heat and keep stirring constantly, making sure to scrape the bottom and corners of the pan. Within a minute or two, the mixture will transition from runny to creamy.
- Continue stirring as the starches gelatinize and the dough forms. You will see soft clumps appear and then quickly unite into one solid mass.
Know When It’s Done
- The dough is ready when it gathers completely around your spoon and the pan looks mostly clean. If you touch it and it does not cling to your fingers, it is done. If it remains sticky, continue cooking on low heat.
Cool and Knead for a Silky Finish
- Scrape the warm dough onto wax paper or a plate to cool. Once it is comfortable to handle, knead it vigorously for a full 2 minutes to achieve a smooth, springy, and professional texture.
Notes
Nutrition
Frequently Asked Questions
Why is my playdough sticky and how do I fix it?
Sticky usually means under-cooked, the starches have not fully activated yet. Put it back in the saucepan and cook on the same low/medium heat, stirring, until it gathers around the spoon and no longer clings to your fingers.
What does cream of tartar actually do in this recipe?
Cream of tartar is potassium bitartrate, and it supports a smoother, more elastic texture while helping the dough stay stable over time. PubChem even lists it as a pH control agent, which connects to why the dough behaves more consistently.
How long will this playdough stay soft and fresh?
Stored airtight in a cool, dry place, it can last up to 6 months, especially with glycerin helping retain moisture. If it ever smells off or shows mold, it is time to replace it.
How do I remove playdough stains from clothes and carpet?
Let it dry completely, brush off what you can, then vacuum. For any remaining residue, blot with mild soap and cold water, and avoid hot water so you do not set the flour.
Can I substitute the cream of tartar with lemon juice or vinegar?
Yes, but expect a little change in texture and often a shorter shelf life. Cream of tartar tends to give the most reliable stretch and smoothness.
Is homemade playdough safe for dogs?
No, the salt level is risky if a pet eats it, even if the ingredients seem “kitchen safe.” Veterinary experts note that high salt content is dangerous for pets, so keep it out of reach and call your vet if any is swallowed.
Conclusion
If you want a play dough recipe that feels plush, looks glossy, and stays soft for the long haul, this stovetop method is the one I keep coming back to. That touch of glycerin is the small secret that makes a big difference, and once you feel the final knead turn it silky, you will understand why.
When you are in the mood to keep the homemade momentum going, I lean on homemade pantry staples to make everyday projects feel special. A little DIY confidence has a way of spreading through the whole kitchen.