Skip to content
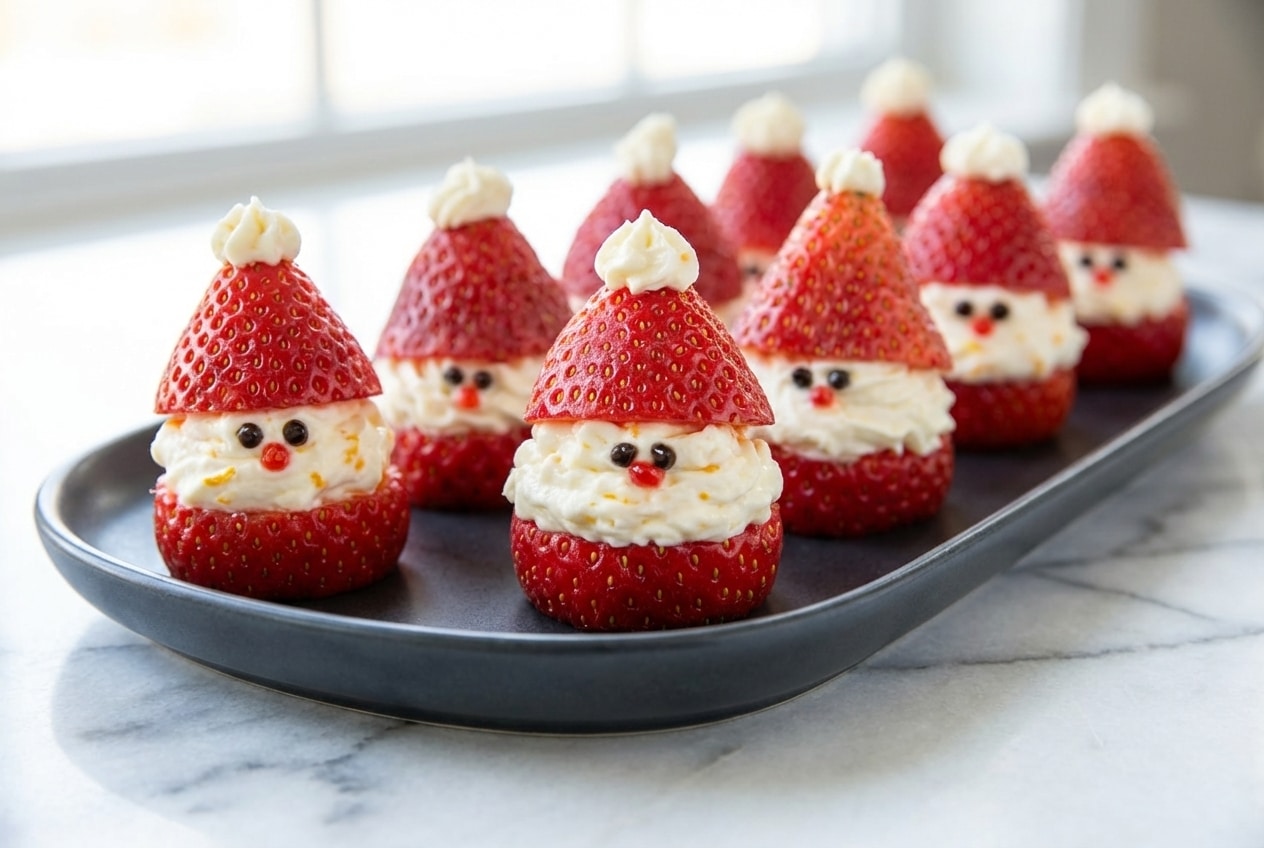
Every December, my kitchen turns into a little workshop, sticky fingertips, giggles at the counter, and one very serious mission, getting cute snacks on the table fast. That’s where these strawberry santa treats shine, they look like you fussed for hours, but they come together in the time it takes to put on a holiday playlist.
They’re a no-bake Christmas dessert that works for cookie swaps, school parties, or a last-minute holiday appetizer when you want something bright and gluten-free. The best part, with one small “chef trick,” they stand tall instead of tipping over.
Why You’ll Love This Recipe
North Pole cute, party-proof: These little edible Santa bites hold their shape on a platter, so you are not rescuing leaning hats right before guests arrive.
Mascarpone-orange magic: In my kitchen, a mascarpone-style richness plus orange zest makes the filling taste brighter and feel sturdier than plain whipped topping, especially when piped with a star piping tip.
Balanced, not cloying: Fresh strawberries bring juicy acidity, and a touch of confectioners sugar in the filling keeps it smooth and pleasantly sweet.
Fast, kid-friendly assembly: A piping bag turns this into a quick craft, little hands can place hats while you handle the “beard” details.
Ingredients and Substitutions

You only need a handful of ingredients, the berries do the heavy lifting, and the whipped cream cheese becomes the “glue” that keeps each Santa standing tall and tidy.
Ingredients
- 12 large strawberries
- 1 cup whipped cream cheese
- 2 tablespoons powdered sugar
- ¼ teaspoon vanilla
- Decorative red and black icing for the face.
Ingredient Notes & Substitutions
Fresh strawberries: Look for big, conical berries with a wide “shoulder,” they naturally make a better Santa hat. Albion and Jewel are especially reliable, because their shape and firmness tend to be consistent.
Whipped cream cheese: This is the easiest path to a stable, pipeable filling. If you only have block cream cheese, soften it well so it blends silky, and beat it until it looks fluffy rather than dense.
Mascarpone twist: When I want the “fancy party” version, I swap part of the cream cheese for mascarpone for extra body and a richer finish. A little fresh orange zest folded in adds a clean citrus lift that plays beautifully with strawberries.
Powdered sugar: Sifting helps keep the mixture glossy and lump-free, which matters when you want that neat “beard” texture through a piping tip.
Decorative eyes: If icing feels fiddly, mini chocolate chips, black sesame seeds, or chocolate sprinkles can make tidy eyes without bleeding color into the white filling.
How to Make strawberry santa
Prep the Strawberries
- Wash the strawberries gently, then dry them thoroughly, I mean bone-dry. Any surface moisture can make the filling slide, and the finished Santas will look “weepy” on the plate.
- Trim off the stem end to create a flat base, then cut each berry in half so the top piece becomes the hat. Aim for a generous top so it looks like a proper Santa cap, not a tiny lid.
Mix the Filling
- In a small bowl, stir together the whipped cream cheese, powdered sugar, and vanilla until the mixture looks smooth and satiny. It should hold soft peaks and smell lightly sweet and vanilla-fragrant.
- Spoon the filling into a piping bag, and press it down so there are no air pockets. If you do not have a piping bag, a zip-top bag with a small corner snipped works, the “beard” will be less ridged but still adorable.
Assemble the Santas
- Set the strawberry bases cut-side down on a plate. Pipe the filling onto each base, building it tall enough to leave a little “face” area, you want height, but not so much that the hat becomes top-heavy.
- Place the strawberry hat on top, then pipe a small dot of filling at the tip for the pom-pom. The finished Santa should look bright red and snowy white, with clean edges and no puddling.
Face Details and Chilling
Use the decorative icing to add eyes and a mouth with a light hand, then serve right away for the prettiest contrast. If you need time, refrigerate until serving, the cold helps the filling stay perky.
Secrets for the Perfect Holiday Santa

The stability secret is all about fat and texture, mascarpone and whipped cream cheese set up thicker than whipped cream. That thicker body acts like gentle mortar, so the hat stays put even on a busy dessert table.
Moisture management is the real make-or-break detail. Notes on moisture management and decay prevention explain why condensation matters.
After you cut the berries, blot the cut surfaces with a paper towel before piping. If you skip this, the strawberry juice can bleed into the white filling, and the “beard” turns pink before the party even starts.
If your strawberry santa leans, the base cut is usually the culprit. I use a sharp paring knife and take a whisper-thin slice until the bottom sits perfectly level, a tiny angle becomes a big wobble once the filling settles.
Pro Tips & Troubleshooting
Pro Tips
- Use a star piping tip for a textured beard, it looks instantly professional.
- Tweezers help place mini chocolate chips neatly for eyes, so the white filling stays clean.
- Kitchen shears are handy for tidying any uneven berry tops for a neat “hat” edge.
- Another fun no-bake finger dessert is mochi ice cream for holiday party variety. It keeps the dessert table playful and easy to serve.
Common Mistakes to Avoid
- Assembling too early, after about 4 hours, the strawberries release moisture and soften the filling.
- Using frozen strawberries, they thaw mushy and cannot support the “hat.”
- Overfilling the face area, too much height makes the hat slide and tip.
- Skipping the drying step, wet berries invite slipping and red streaks.
Serving & Storage

Creative Serving Ideas
- Serve on a “snowy” platter with shredded coconut or a dusting of powdered sugar.
- Set each Santa on a chocolate wafer or mini Oreo for a stable, easy-to-grab base.
- Sparkling cider or hot cocoa makes a cozy pairing for kids and adults.
For a coordinated strawberry-themed dessert table, a scoopable strawberry brownie trifle fits beautifully beside these. The contrast of creamy layers and fresh berries feels very holiday without being heavy.
Storage & Transport
- Refrigerate until serving to keep the filling firm and the hats in place.
- For potlucks, nestle each Santa into a mini muffin tin slot, it prevents sliding in the car.
- Leftovers keep best for a short window, the berries will continue to weep as they sit.

Festive Strawberry Santa Treats
Equipment
- Piping bag
- Star piping tip
- Paring knife
- Mixing bowl
Ingredients
- 12 large strawberries
- 1 cup whipped cream cheese
- 2 tablespoons powdered sugar
- ¼ teaspoon vanilla
- Decorative red and black icing for the face.
Instructions
Prep the Strawberries
- Wash the strawberries gently and dry them thoroughly. Any surface moisture can make the filling slide or look weepy.
- Trim off the stem end of each berry to create a flat, stable base. Cut the berry in half crosswise so the pointed top becomes the Santa hat.
Mix the Filling
- In a small bowl, stir together the whipped cream cheese, powdered sugar, and vanilla until the mixture is smooth and satiny.
- Spoon the cream cheese mixture into a piping bag and press it down to remove any air pockets. A star tip works best for a textured beard.
Assemble the Santas
- Place the strawberry bases cut-side down on a serving platter. Pipe the filling onto each base, building enough height to create a face area.
- Gently place the strawberry hat on top of the filling, then pipe a tiny dot of cream cheese on the tip of the hat for the pom-pom.
Face Details and Chilling
- Use decorative red and black icing to add eyes and a mouth. Serve immediately or refrigerate until serving to help the filling stay perky.
Notes
Nutrition
Conclusion
When I want something festive without turning on the oven, strawberry santa treats are my go-to. That mascarpone-orange idea is the quiet little upgrade that keeps them sturdy and makes the flavor taste grown-up enough for a cocktail party.
Play with the faces, switch up the “eyes,” and let the platter look whimsically imperfect, that’s half the charm. If you’re building a bigger spread, that strawberry brownie trifle keeps the theme going in the sweetest way.
Frequently Asked Questions
How far in advance can I make these?
I keep it within 2 to 4 hours of serving. After that, the cut strawberries start releasing juice and the white filling softens and stains.
How do I prevent the strawberries from “leaking” red juice into the white cream?
Dry the berries well after washing, then blot the cut surfaces with a paper towel right before piping. That tiny step keeps the “beard” bright white longer.
Can I use store-bought frosting instead of homemade?
You can, but many tubs are too soft for a stable Santa. If it looks loose, mixing in a bit of softened cream cheese helps it hold shape better when piped.
What’s the trick to making them stand up straight?
Make the bottom cut perfectly flat, then use a thick filling like whipped cream cheese or mascarpone-style cheese. A level base plus a sturdy “glue” keeps the hat from sliding.
Are these healthy enough for a school snack?
They’re mostly fruit with a small amount of sweetened cheese, which many families like as a lower-sugar option than cookies. The nutritional profile of raw strawberries also shows they’re nutrient-dense for such a festive treat.
How do I store leftovers if they don’t all get eaten?
Cover and refrigerate, then eat them as soon as you can for the best texture. The longer they sit, the softer the strawberries get, and the filling can start to loosen.